Tips and Tricks WP eCommerce

eCommerce Solution for WordPress Blog

  • Home
  • eCommerce Plugins
  • WP eStore Documentation
  • WP Shopping Cart Doc

WP eStore and Constant Contact Integration Addon

This addon has been deprecated. It is no longer being sold.

The users are added to the Constant Contact list when any of the following event happens:

  1. A customer purchases a product that has a list name specified for it.
  2. A visitor submits a squeeze form for a product that has a list name specified for it.

Installing the Constant Contact Addon

You can install this addon the same way you install any WordPress plugin:

  • Go to the Add New plugins screen in your WordPress admin area
  • Click the Upload button
  • Browse for the addon file (estore-constant-contact-addon.zip)
  • Click Install Now and then activate the plugin

Addon Usage

Step 1) Click on the “Constant Contact” menu link from the main eStore plugin’s admin menu.

Step 2) Enable the integration then fill in the API key and other API details. Then hit the “update” button to save.

You can get the API details from your Constant Contact account.

Step 3) Edit the eStore product in question and specify your Constant Contact “List Name” in the List Name field of the product.
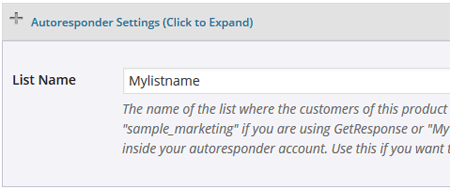
Now, when a customer purchase this product, the addon will automatically add this user to the specified list.
W3 Total Cache and Simple Shopping Cart Integration

The simple shopping cart plugin was designed to work with the W3 Total Cache plugin.

Integration Steps for W3 Total Cache Plugin

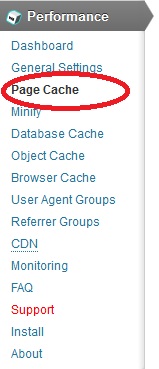
Step 1) Go to the “Page Cache” menu in your W3 Total Cache plugin.

Step 2) Add the following line in the “Rejected Cookies” field under the “Page Cache” settings menu of the W3 Total Cache plugin and all done:

cart_in_use

Where is the “Page Cache” menu in W3 Total Cache Plugin?

The folloiwng screenshot will tell you where to find the page cache menu:

Running Additional Tasks After a Sale via the Simple Cart Plugin

You can run some additional tasks after the simple cart plugin has processed a sale.

Note: This should only be tried by a developer as it involves custom PHP coding.

The plugin includes action hooks that are triggered after the checkout data is processed. These hooks allow you to perform additional custom tasks. Below is a code snippet demonstrating how to use one of these action hooks.

You can add this code to the functions.php file of your theme or to a custom plugin.

Table of Contents

  • PayPal Commerce Platform
  • PayPal Standard
  • Stripe Checkout

PayPal Commerce Platform

Here is example code if you are using the PayPal Commerce Platform (PPCP) checkout option.

add_action('wpsc_paypal_checkout_ipn_processed', 'wpsc_custom_post_payment_tasks');
function wpsc_custom_post_payment_tasks($ipn_data)
{
    //You can write the $ipn_data array's content to a file.
    $firstname = $ipn_data['first_name'];
    $lastname = $ipn_data['last_name'];
    $email = $ipn_data['payer_email']
    //TODO - Do something with the data
}

PayPal Standard

Here is example code if you are using the standard PayPal checkout option.

add_action('wpsc_paypal_ipn_processed', 'wpsc_pp_ipn_tasks');
function wpsc_pp_ipn_tasks($ipn_data)
{
//You can write the $ipn_data array's content to a file to see
//what paypal sends in the IPN
$firstname = $ipn_data['first_name'];
$lastname = $ipn_data['last_name'];
$email = $ipn_data['payer_email']
//Do something with the data

}

The PayPal IPN message consists of variables and is available as an array inside your function. You can access an element of the array by using the proper variable name. To see a list of all the available variables please check the PayPal IPN documentation page.

Stripe Checkout

Here is example code if you are using the Stripe checkout option.

add_action('wpsc_stripe_ipn_processed', 'wpsc_stripe_post_payment_tasks');
function wpsc_stripe_post_payment_tasks($ipn_data)
{
//You can write the $ipn_data array's content to a file.
$firstname = $ipn_data['first_name'];
$lastname = $ipn_data['last_name'];
$email = $ipn_data['payer_email']
//TODO - Do something with the data
}

Setup Pay Per View with Indefinite Access to the Purchased Content

Normally when you setup pay per view content and sell access to a page, the access expires after a configurable amount of time.

If you don’t want the access to expire (so the user can view the page indefinitely) then do the following:

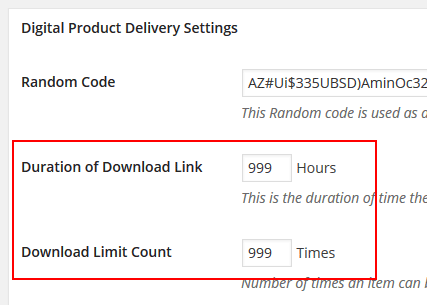
  • Go to eStore settings menu
  • Enter a value of “999” in the “Duration of Download Link” field
  • Enter a value of “999” in the “Download Limit Count” field
  • Save the settings.

disable-link-expiry-feature-settings

This will turn off the automatic link expiry feature. So after a user purchase the item, they can click on that link whenever they want to view the content and they will be given access to that page.

How to Display a List of Popular Products

The popular products shortcode allows you to do the following:

Display any number of popular products (based on the number of quantity sold) from your available products.

How to Display Your Popular Products.

You can use the eStore and the Extra Shortcodes add-on to display popular products easily. You just need to follow the steps outlined below.

Step 1: You will need to have the eStore and the Extra Shortcodes add-on installed on your site.

Step 2: Create a page where you want to display the list of popular products. You can also use an existing page or widget.

Step 3: Place the below shortcode where you want your popular products to be displayed.

[wp_eStore_popular_products number=1 style=1 type=1]

Parameters you can modify in this shortcode.

• Number of products (number) This is how many products you want to be displayed using the shortcode. Example: If you set this number to 5 the shortcode will display the 5 most popular products.

• Style (style) This allows you to use different fancy displays to show your products. You can see a full list of the fancy display templates here.

• Button type (type) This allows you to specify what type of button you want to use. Example: Buy Now, Add to Cart, Subscription or Download Now.

Related Documents

  • Display a List of Random Products
  • Display a List of Latest Products

Simple Shopping Cart – Customize the Thumbnail Section of the Product Box

You can customize the thumbnail image section of the product box display to suite the way you want to show it.

Below is an example of how the thumbnail section of the product display box looks like:

product display box example

Now, lets say you are using a lightbox plugin and you wanted to add lightbox to the thumbnail image. Below is an example snippet of code to show you how you can customize the thumbnail image section to accommodate that:

add_filter('wspsc_product_box_thumbnail_code', 'wspsc_my_custom_thumbnail_code', 10, 2);
function wspsc_my_custom_thumbnail_code($img_code, $args)
{
    $thumbnail_src = $args['thumbnail'];
    $img_code = '<a href="'.$thumbnail_src.'" rel="lightbox"><img src="'.$thumbnail_src.'" alt="'.$args['name'].'" ></a>';
    return $img_code;
}

How to Receive Buyer’s Phone Number from PayPal

To receive contact phone number of buyers, you will need to enable an option in your PayPal merchant account.

Step 1) Log into your PayPal account

Step 2) Go to Profile -> My Selling Tools -> Website preferences

It should be at this page in your PayPal account.

Note: PayPal changes their website interface frequently so you may have to look for it a bit.

Step 3) Set Contact Telephone to On (Required Field)

screenshot showing how to accept buyer phone number with a paypal order

Step 4) Save your settings

Simple Shopping Cart – Resize/Customize the Shopping Cart Width

The simple shopping cart is responsive, so it will automatically fit into the container you put it in. However, if you want to re-size the width of the cart shortcode output then use the following CSS tweak:

Step 1) Grab this custom CSS plugin

Step 2) Add the following CSS code in that plugin.

The following make the width of the shopping cart 70% of the parent container:

.shopping_cart{
width: 70% !important;
}

Alternatively, you could use a pixel value like the following:

.shopping_cart{
width: 300px !important;
}

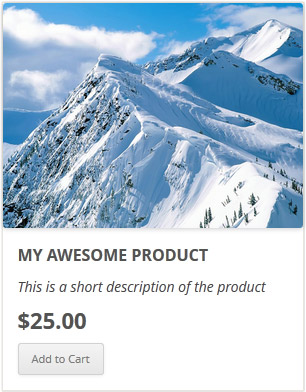
Product Display Template for Selling Videos

If you are selling videos from your WordPress site and you want to present the video product using a nice template then use this addon plugin.

You can configure a preview of the video that you are selling so your customers can preview it before purchasing the item.

Note: The video preview will need to be a YouTube video.

screenshot showing the video product template

Clicking on the “Play” button will preview the video in a lightbox window (see example below).

video-product-display-lightbox-preview

Installing the Video Product Template Addon

You can install this addon the same way you install any WordPress plugin:

  • Go to the “Add New” plugins screen in your WordPress admin area
  • Click the “upload” tab
  • Browse for the addon file (eStore-video-products.zip)
  • Click “Install Now” and then activate the plugin

Using this Addon

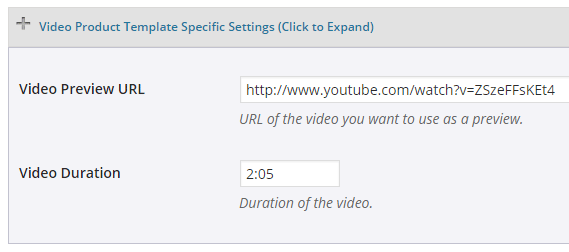
When this addon is active, You can easily enter some video specific information in the “Add/Edit Product” interface.

  • Video Preview URL: URL of the video that will be used as a preview on the front end (YouTube/Vimeo)
  • Video Duration: Duration of the video (It will also be displayed on the front end)

screenshot showing how to configure information for video product template

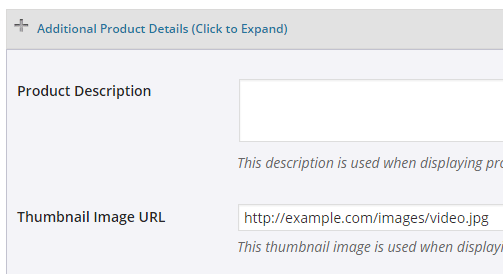
Since the video template requires a thumbnail for the video you will need to specify one in the Thumbnail Image URL field.

screenshot showing the thumbnail image url field of video product

Click the “Save” button to update the product.

Video Product Template Display

Create a new post/page and specify the following shortcode to show your video template:

[wp_eStore_video_product_template id=”2″]

Here, The value of id is the unique product ID for your eStore video product.

screenshot showing the video product template

Get the Video Product Display Template Addon

The price of this addon is $39.95

Please contact us to purchase this addon.

Customizing Price Amount Display Currency Formatting

You can customize the price amount display formatting to suite the way prices are displayed in your country and currency.

Here are some examples:

By default the price amount is display like the following:

$25.00

In your country and currency, you may want to show the currency symbol at the end of the amount. Below is an example of how you can customize the price display amount.

Simply add the following block of code to your functions.php file of the theme:

add_filter('wspsc_print_formatted_price', 'wspsc_my_custom_price_format', 10, 3);
function wspsc_my_custom_price_format($formatted_price, $price, $symbol)
{
    $formatted_price = number_format($price, 2, '.', ',') . ' '. $symbol;
    return $formatted_price;
}

It will now show the price amount like the following

25.00 zł

You could also change the decimal separator to be “,” and the thousand separator to be “.” in the price output. Here is an example of how to do that (add the following code to your functions.php file of the theme):

add_filter('wspsc_print_formatted_price', 'wspsc_my_custom_price_format', 10, 3);
function wspsc_my_custom_price_format($formatted_price, $price, $symbol)
{
    $formatted_price = $symbol . number_format($price, 2, ',', '.');
    return $formatted_price;
}

It will now show the price amount like the following

₤25,00

« Previous Page
Next Page »

Your Shopping Cart

Shopping Cart Empty
Shopping Cart is Empty
Visit The Shop

Search

Featured Documents

Stylish Product Display Options for WP eStore WP eStore Quick Setup and Usage Video Tutorial WP eStore Shortcodes and Functions Reference WordPress eStore Plugin Features WordPress eStore Plugin Demo What Our Customers Have to Say About Our Products WordPress eStore WishList (Feature Suggestions) WordPress eStore Frequently Asked Questions (FAQ) How to Show Add to Cart buttons

Featured Plugins

WP Express Checkout Plugin
wordpress_estore_icon
wordpress membership plugin icon
wordpress_affiliate_plugin_icon

Copyright © 2025 | eCommerce Plugins