Tips and Tricks WP eCommerce

eCommerce Solution for WordPress Blog

  • Home
  • eCommerce Plugins
  • WP eStore Documentation
  • WP Shopping Cart Doc

Showing a Shopping Cart with Product Image Thumbnails

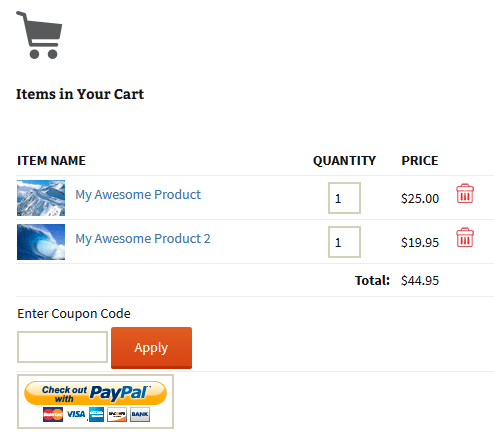
In this tutorial, I will show you how you can show an image thumbnail of your product in the shopping cart when using the Simple Shopping Cart plugin. The goal is to create a shopping cart that looks like the following example:

shopping-cart-with-product-image-thumbnail

Step 1. Specify the Thumbnail Image URL in the Button Shortcode

Specify your thumbnail image in the add to cart button shortcode using the “thumbnail” parameter. See example below:

[wp_cart_button name="Test Product" price="19.95" thumbnail="http://www.example.com/my-product-image.jpg"]

Step 2. Specify the Show Thumbnail Parameter in the Shopping Cart Shortcode

Add the “show_thumbnail” parameter in your shopping cart shortcode. See example below:

[show_wp_shopping_cart show_thumbnail="1"]

or

[always_show_wp_shopping_cart show_thumbnail="1"]

Now, when your customers add items to the cart, they will see the product image thumbnails that you specified in the add to cart button shortcode.

What If I am Using WP eStore Plugin?

There is a similar feature in the WP eStore plugin also. So you will be able to create a shopping cart with product image thumbnails if you are using that plugin also.

Adding a Shopping Cart to The Sidebar of Your WordPress site

Use the following steps to add a shopping cart to the sidebar of your WordPress site. This will allow your customers to see what items they have in their cart when browsing and adding items to the cart.

Steps to Add a Sidebar Shopping Cart

Step 1) Go to the widgets menu of your WordPress admin dashboard area.

Step 2) Add a standard text widget to the sidebar of your site. Your theme need to support sidebars.

adding-a-sidebar-cart-widget

Step 3) Use one of the following shortcodes to add the cart in this sidebar widget:

[show_wp_shopping_cart]

or

[always_show_wp_shopping_cart]

The first shortcode will only show the cart if there are any items in the cart. The 2nd one will always show the cart (even if the cart is empty).

Try them both and use the one that you like.

Below is an exmaple of how the cart should look on the sidebar:

how-the-cart-looks-on-the-sidebar

Adding the Cart to the Sidebar via a Template File

If you are a developer and you are trying to add the cart to the sidebar from your theme’s template file then use the following PHP function:

<?php echo print_wp_shopping_cart(); ?>

How to Use Pay What You Want Price for Your Product

In this tutorial I will explain how you can charge a “Pay What You Want Price” to sell your products.

There is an option in the eStore that allows you to make products where customers can choose what they want to pay you for a product.

How to Setup the “Pay What You Want” Feature

Step 1: Create a product as you would normally do.

Step 2: Specify the minimum amount you want your customers to pay in the “Price” field for this product. Example: $5.00

Step 3: In the product settings under “Additional Product Details” section, check the following option:

pay what you want price

Now, when you put the “Add to Cart” button on the page for this product, it will have an option to enter a custom price field next to the button. This will allow the customer to specify how much they want to pay for this product. Example Below:

pay-what-you-want-price-example

Using Pay What You Want Price with a Display Template

If you want to use a fancy display template with this feature, it will look like the following:

Customer Specifies a Price Demo
This is a test description. This description is here to show how the description of this product looks like.
Price: $2.00
Your Price: $ 

WP Shopping Cart – Stacking Multiple Product Boxes Side by Side

I received the following question today from one user:

I love the display box feature, yet I cannot get them to align horizontally on the page. How can I get more that one item per line?

In this tutorial I will explain how you can stack the product boxes side by side to display multiple products in one line.

Preparation

If you don’t know how to create a product box using the WP Shopping Cart plugin then read this page first.

CSS Tweaks

I am going to apply a few custom CSS tweaks to stack the product boxes horizontally.

Step 1) Grab this custom css plugin (it allows you to add your custom CSS code without modifying the main plugin).

Step 2) Lets make the product boxes narrower so there is more room to have multiple boxes side by side.

Add the following block of CSS code in the custom CSS plugin’s interface to define a maximum width of 250px for the boxes.

.wp_cart_product_display_box{
max-width: 250px;
}

You can use a different value if you want to make it narrower.

Step 3) Lets float the product boxes so they stack. Add the following CSS code just below the max-width that you defined in step 2:

float: left;

You should have the following combined CSS code and the boxes should be stacked side by side now:

.wp_cart_product_display_box{
max-width: 250px;
float: left;
}

Step 4) Finally, lets give it some margin to add some space between the boxes.

Add the following CSS code just below what you defined in step 3:

margin-right: 10px;

You should have the following combined CSS which is the final code

.wp_cart_product_display_box{
max-width: 250px;
float: left;
margin-right: 10px;
}

The Final Output

The final output should look like the following example (your product boxes will be aligned horizontally):

shopping-cart-grid-product-boxes-example

Our WP eStore plugin has more product display templates and better grid layout options. You can check the styles offered in WP eStore by visiting this page.

Apply a Discount or Coupon Code to the Cart via a URL or Link

WP eStore plugin has a feature to apply a discount code via the URL.

Step 1) First, you need to install the extra shortcodes addon (if you haven’t done it already)

Step 2) Now, you can append the following query argument to the end of an URL to create a link that will apply the discount code in the shopping cart:

?discount_code=COUPONCODE

Lets say for example, the WP eStore shopping cart is on the “http://www.example.com/cart” page, then the URL with the discount code will be the following:

http://www.example.com/cart/?discount_code=COUPONCODE

When you create a link using the above URL, it will apply the discount in the cart.

apply-discount-coupon-code-via-url-example

Add Item to the Cart and Apply Discount At the Same Time

Sometimes you may want to add an item to the shopping cart via a link and then apply a discount to the cart at the same time. You can do that by specifying the discount code in the URL when using the purchase product via link feature.

When you do this, the customer clicking on the call to action link will see that the item is added to the cart with a discount applied to it.

You can learn how to use this feature here.

Simple Cart – Showing a Compact Shopping Cart

Sometimes you may want to display a compact shopping cart on your sidebar or in a post. This allows the users to see that they have items in the cart and they can click a view cart button to go to the full shopping cart page.

Use the following shortcode where you want to show the compact shopping cart:

[wp_compact_cart]

You can add this shortcode in a standard text widget to add the compact cart to the sidebar of your theme.

When there are no items in the cart, the shorcode will produce the following output:

compact-cart-shortcode-output-for-empty-cart

When users add item(s) to the cart, it will show a compact shopping cart output like the following:

compact-cart-shortcode-output-items-in-cart

Clicking the “view cart” link will take them to the page that you specified in the “Checkout Page URL” field of the plugin settings.

Compact Cart Style 2

This second compact cart uses a different style than the one mentioned above. It looks like the following example:

simple-cart-compact-cart-2-example

To use this compact cart on your site, use the following shortcode:

[wp_compact_cart2]

You can add this shortcode in a standard text widget to add it to the sidebar of your site.

Creating a Specific Checkout Page for Your Site

You should create a checkout page before using the compact cart shortcode. Here is how to do it (if you haven’t done it already):

Step 1) Create a new WordPress page

Step 2) Add the following shortcode to this newly created page

[always_show_wp_shopping_cart]

Step 3) Go to the plugin settings and specify the URL of this newly created page in the “Checkout Page URL” field.

Showing a Compact Cart In Your Theme’s Header

Add the following code in your “header.php” file to show a compact cart in your theme’s header area:

<?php echo do_shortcode('[wp_compact_cart]'); ?>

How to Setup PayPal IPN Notification

Instant Payment Notification (IPN) allows you to integrate your PayPal payments with your website’s back-end operations, so you get immediate notification and authentication of the PayPal payments you receive.

Note: This is not needed for the PayPal Commerce Platform (PayPal’s New API).

Video Tutorial on PayPal IPN Setup

Written Instruction

Do the following to enable IPN in your PayPal account:

locating-IPN-new-PayPal
  1. Log into your PayPal account.
  2. Click on the “cog” icon in the right hand corner and then on “Account Settings“.
  3. Under “Solutions and Services” click on “Website Payments“.
  4. Look for an option labelled “Instant Payment Notification“. Click on the update button for that option.
  5. Click “Choose IPN Settings“.
  6. Enter the URL of your website and hit “Save“.
enable-paypal-ipn-in-your-profile

Resend PayPal IPN Message

Read the how to Resend PayPal IPN message tutorial.

PayPal Beginner Video Tutorials

The PayPal beginner video tutorials is a good resource to check if you are new to PayPal as a merchant.

How to Enable PayPal API Access and Get the API Details

The following steps (with screenshots) show you how you can enable API access in your PayPal account and get the API details to use in your shopping cart admin/configuration screen:

  • Log in to your PayPal Business account.
  • Make sure your PayPal account is verified (you need to verify your account before requesting API credentials).
  • Click on the My Account tab (if you are not there already)
  • Click on the Profile link.
  • Click on the My Selling Tools link

paypal-my-selling-tools-link

  • Click on the update button in the API Access row

paypal-api-access-link

  • Click Request API credentials link.

paypal-request-api-access-screen

  • Select the Request API signature radio box.
  • Click Agree and Submit.

api-request-agreement-screen

  • Copy and paste the API username, password, and signature into your shopping cart’s configuration or administration screen.

You can also check this page on PayPal for instruction on how to get your API details.

How To Sell Sheet Music From Your WordPress Site Securely

In this tutorial I will cover how you can sell sheet music from your WordPress site securely (protecting the sheet music file).

This will be a simple and quick tutorial.

Things you will need to sell sheet music from your WordPress site.

  • A WordPress site
  • WP eStore Plugin
  • PDF Stamper Plugin

Step 1: Install eStore and configure the plugin:

You will need to install the eStore plugin on your WordPress site. You can use the following links to get the plugin. Then check the install/usage videos to set it up (it is very easy to set it up).

  • Get the eStore
  • Install and Usage Videos

Step 2: Install the PDF Stamper (optional):

Next you will need to install the PDF Stamper (this step is optional). The PDF Stamper is to help protect your sheet music files from being shared. You can read more about the PDF Stamper plugin here.

  • Get the PDF Stamper
  • PDF Stamper Documentation

Step 3: Start selling your sheet music online:

Once you have both plugins installed and configured you are ready to create your products and start selling your sheet music securely.

Translating The WP Simple Shopping Cart Plugin

Method 1

You can translate the plugin from translate.wordpress.org site. Link below:

https://translate.wordpress.org/projects/wp-plugins/wordpress-simple-paypal-shopping-cart

Method 2

Alternatively, You can use the PO File editor to do the translation. Here is a step by step guide on how you can translate the WordPress Simple Shopping Cart plugin in your language.

1. Download and install Poedit (http://www.poedit.net/download.php)

2. Get the plugins POT file (wordpress-simple-paypal-shopping-cart.pot). You can find this file inside the “languages” folder of this plugin.

3. Run Poedit software (if it is not running already)

4. Open the POT file in Poedit. (Click the open link in the software then browse to the POT file location and select that file)

5. Select each translatable text and add the translation in the box that says “Translation”

6. Finish translating the whole file.

7. Go to File -> Save as to save your translations in a PO file.

8. When you are finished translating, go to File -> Save as again to generate the MO file.

Or you can set your Poedit to always compile a MO file when saving changes by clicking File -> Preferences and on the Editor tab check the Automatically compile .mo file on save box.

9. Contact us and send us the translated .mo and .po files and we will add it to the plugin.

« Previous Page
Next Page »

Your Shopping Cart

Shopping Cart Empty
Shopping Cart is Empty
Visit The Shop

Search

Featured Documents

Stylish Product Display Options for WP eStore WP eStore Quick Setup and Usage Video Tutorial WP eStore Shortcodes and Functions Reference WordPress eStore Plugin Features WordPress eStore Plugin Demo What Our Customers Have to Say About Our Products WordPress eStore WishList (Feature Suggestions) WordPress eStore Frequently Asked Questions (FAQ) How to Show Add to Cart buttons

Featured Plugins

WP Express Checkout Plugin
wordpress_estore_icon
wordpress membership plugin icon
wordpress_affiliate_plugin_icon

Copyright © 2025 | eCommerce Plugins