Tips and Tricks WP eCommerce

eCommerce Solution for WordPress Blog

  • Home
  • eCommerce Plugins
  • WP eStore Documentation
  • WP Shopping Cart Doc

How to Integrate WP eStore with AWeber

The WP eStore shopping cart plugin can be easily integrated with AWeber (Email marketing and Autoresponder service) so that your customers can get signed up to your AWeber list when they make a purchase.

The users are added to your AWeber list when any of the following event happens:

  1. A customer purchases a product.
  2. A visitor submits a squeeze form for a product.

Step 1: Make a Connection to the AWeber API

To connect eStore with the AWeber API, go to the eStore Settings -> Autoresponder Settings menu and authorize the “Tips and Tricks HQ” app (click on the following image to see a bigger screenshot):

AWeber Integration Settings

AWeber Integration Settings

After you hit the “Make Connection” button you should see the following message (meaning the connection was established successfully):

AWeber Authorization Success

Step 2: Specify Your AWeber List ID or Name as Appropriate

Now all you need to do is specify the AWeber list ID of the list where you want your customers to be signed up to.

Below is an example of how an AWeber list ID looks like (you get this from your AWeber account):

awlist1234567

You can signup all of your customers to one global list by checking the “Global AWeber Signup” option and then specifying the list ID in the “Global AWeber List Name” field. Make sure to hit the “Update” button at the bottom of the Autoresponder settings page after you make the changes.

You can also signup your customers to a specific list on a per product basis by specifying the list ID value in the “List Name” field under the “Autoresponder settings” section of the product in question.

Filed Under: Additional Resources Tagged With: Autoresponder, AWeber, WordPress eStore

WP eStore Quick Setup and Usage Video Tutorial

You should watch all the following video tutorials to familiarize yourself with the basic functionality of the WP eStore plugin.

1. WP eStore Installation

2. WP eStore Quick Setup, Product Creation and Basic Testing

Miscellaneous Basic eStore Tutorials

A. WP eStore Settings Configuration

B. How to Configure a Product

C. Display a Product on a Post or Page

D. How to Use Product Display Templates

E. Using a Link To Sell Your Item

F. Creating a PayPal Buy Now Button Using eStore

G. Creating a PayPal Subscription Button Using eStore

H. Creating a PayPal Donation Button Using WP eStore

Hide a Page from The Navigation Menu

You can follow the navigation menu customization tutorial to learn how you can customize your navigation menu.

If you want to see more video tutorials then please leave your suggestion in the comment section below.

Filed Under: Featured, Installation and Usage Tagged With: Video Tutorial, WordPress eStore

WordPress e-Commerce Knowledgebase

Express Checkout System

The WordPress Shopping Cart and WP eStore plugins use the express checkout model for a simple and quick checkout process.

Typical online checkouts require customers to work through numerous steps, which involve entering personal, financial and delivery information. The fact is, every step in this often-tedious and frustrating process presents a real risk that your customer will change their mind and abandon the shopping cart.

The express checkout model allows you to fast track your checkout process by tapping into personal, financial and delivery information which existing PayPal customers already have stored with PayPal. Customers can checkout quickly with WP eStore as it requires minimum number of clicks and form filling from your users to perform a checkout (this helps keeping the cart abandonment rate low).

What is (Instant Payment Notification) IPN?

Instant Payment Notification (IPN) is PayPal’s interface for handling real-time purchase confirmation and server-to-server communications. IPN delivers immediate notification and confirmation of PayPal payments you receive and provides status and additional data on pending, cancelled, or failed transactions.

paypal-ipn-diagram_438

How does the WP eStore Plugin Work?

Most e-Commerce plugins take over your blog by automatically creating all kinds of pages for products and checkout and doesn’t give the ultimate flexibility in how you display a product. I am not saying it doesn’t have it’s usage but what if you wanted to fully design how your product display looks like and where exactly the “Add to Cart” buttons and the “Shopping Cart” appear? What if you wanted to sell something from your blog posts and pages? What if you wanted a shopping cart that integrates nicely into your existing site without having to redesign?

The WP eStore doesn’t create anything for you automatically, instead it gives you the building blocks of an e-Commerce site so you can build it the way you want it to look and function.

After you Add/Configure a product, you can display it in various ways anywhere you like on your WordPress powered site (eg. in the post, page, header, footer, sidebar etc).

You use a special piece of text (shortcodes) in your post or page where you want the product to be displayed. You can tell it to give you a bare “Add to Cart”, “Buy Now” or “Subscription” button on a post or page so you can fully design the product display with images and description yourself.

You can also use a pre-configured product display template to display the product if you don’t like to design the product display. The eStore comes with a few product display templates (You can see some examples here).

Once you have the Buy buttons in place, you can display the shopping cart wherever you like on your site. Again this is done through the use of a special piece of text (shortcode). You can create a “Checkout” page and display the shopping cart there or you can place the shopping cart on the same page where the buttons are or on the sidebar (the choice is yours).

All the WP eStore shortcodes and function references (building blocks of your eCommerce site) can be found here.

WP eStore’s Typical Transaction Cycle

The following block diagram gives an overview of the typical actions involved in a complete transaction cycle. This example uses PayPal as the payment gateway. The same principal applies to any payment gateway checkout via eStore.

wp_estore_overview_diagram

You receive the money in your PayPal account and the buyer gets an encrypted dynamically generated download link for the product in an email.

The Post Payment Verification Process

There are a number of parameters that are verified before the digital product is delivered to the customer. This following diagram explains what happens in the background once a customer makes a payment for a product. This example uses PayPal as the payment gateway. The same principal applies to any payment gateway checkout via eStore.

Post Payment Verification Process

Post Payment Verification Process

Buyers can pay using a Credit Card or their PayPal account

Buyers don’t have to have a paypal account to be able to pay you. They can pay by credit card too if you have a Premier or Business PayPal account (these are free). PayPal will give your customers the option to pay by credit card if they don’t have a PayPal account. When your customers go to the checkout page on PayPal they will see a line similar to the following that they can click on and use the credit card to pay:

Customer Can Choose to Pay Using a Credit Card

PayPal normally figures out if you have a PayPal account or not from the cookies on your computer. Try deleting all the cookies and hit the checkout button to go to PayPal and it will present you with the option to pay by credit card upfront (similar to the screenshot below).

Customer Can Pay via a Credit Card

Note: If you want to use recurring/subscription payment option and would like to accept credit card for the recurring payment then PayPal may require you to add “Enhanced Billing” option to your PayPal merchant account.

How to Collect Special Instructions from the Customer

If you need to collect special instructions from the customer for some customized work on the item you are selling then you can use the “Collect Customer Input” feature of eStore or  instruct your buyer to put it in the “Special instructions to merchant” box on PayPal during checkout. Please note that this option is shown on the “Review your payment” screen

paypal-special-instruction

Collecting Special Instruction from the Buyer

Review Payment

Review Payment Screen

Filed Under: Additional Resources Tagged With: Knowledgebase, WordPress eStore

WP eStore – Instant Digital Product Delivery on A Thank You Page

In addition to the product delivery via email (which is the default delivery method), you can also choose to deliver the digital products on a post-payment return page (example, a Thank You page). This allows the customer to be able to download the Digital goods via an encrypted link instantly after the transaction.

Emails are delivered instantly too but sometimes it can take a few minutes (if PayPal’s server is busy they can take a few minutes to send the payment notification that is used for emailing the customer).

Examples

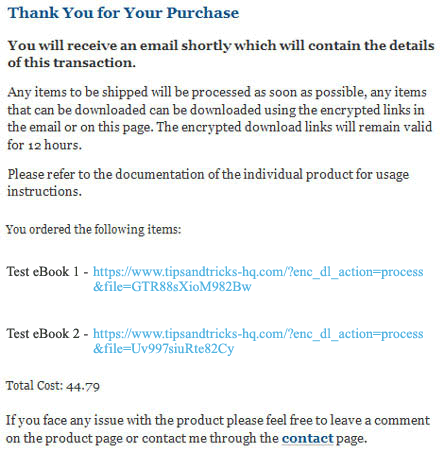
The following is a screenshot of my “Thank You” page that is using the “Instant Digital Product Delivery on the Thank You page” feature:

Thank You Page Screenshot Before Payment

The following is a screenshot of the same page when someone makes a purchase and returns to this page after payment:

Thank You Page Screenshot After Payment

Product with Multiple File Downloads

If you have a product that has multiple downloadable files (example: a large file broken into multiple parts) then it will appear as separate file downloads (each file will be a separate download).

How to Use the Instant Digital Delivery Feature

Just to make it clear… this is an additional product delivery option that you can use. The plugin will automatically send an email to the buyer after a purchase with the download links by default even if you are not using this method/feature.

This function uses PayPal’s PDT (Payment Data Transfer) feature. Watch the video tutorial (recommended) or follow the steps outlined below to take advantage of this feature:

Video Tutorial

Step By Step Setup Instructions

Step 1) Make a post-payment return page (example, a Thank You or Transaction Result page). Use the URL of this page in the “Return URL” field of the settings menu of eStore. This is the page where your customers are going to land when they return from PayPal after the payment. Make sure you do not make this page a private page (private pages can only be accessed by someone who is logged into WordPress). It doesn’t matter if someone goes to this page without making the payment (the links only appear after they make the payment).

Step 2) Add whatever message you want to add to this “Thank You” page and then put the following shortcode where you want to display the transaction result (product download links):

[wp_eStore_display_transaction_result]

Step 3) Enable PDT feature in your PayPal profile. If you don’t know how to enable PDT and get the PDT Identity Token then this document should help (check the “Activating PDT” section on that page).

Step 4) Make sure you have enabled “Auto Return” option too . You can enable the “Auto Return” option from the same PayPal profile page where you enable PDT.

Step 5) Specify the PDT Identity Token that you received from PayPal in the “PDT Identity Token” field of the PayPal Payment Gateway Settings menu of WP eStore.

Step 6) Finally, enable the “Thank You” page display feature in eStore by checking the “Enable Transaction Result Display” in the settings (Post Payment Process Settings) menu of WP eStore.

The transaction result will display the message that the customers are also going to get in the email. It will have a list of products they ordered with a unique encrypted download link for each digital product so it can be downloaded instantly.

Important Note

Please note that some of the comments below are out of date. Over the course of time PayPal has made changes so we had to adjust the plugin accordingly (for example: currently you need to have auto redirect enabled in your PayPal account for this feature). The documentation above is up to date, so follow the steps outlined above to use this feature.

Filed Under: Installation and Usage Tagged With: Usage, WordPress eStore

WP eStore License

WP eStore
End User License Agreement
Copyright, Tips and Tricks HQ (https://www.tipsandtricks-hq.com/)
All rights reserved.

This plugin uses the GNU General Public License. By using the software, you agree to be bound by the terms of GPL license. If you have any questions about the terms, please contact Tips and Tricks HQ for clarification.

Filed Under: Additional Resources Tagged With: License, Resources, WordPress eStore

WP eStore Shortcodes and Functions Reference

This page has all the available Shortcodes and PHP functions that you can use to create various buy buttons, download buttons, shopping carts, product details etc. in various ways. Read through the list of shortcodes so you know all the product selling power you have when using this plugin.

If you are using the block editor, you can copy and paste any shortcode into a standard text or shortcode block.

WP eStore Standard Shortcodes List

The following PDF file has a list of all the standard shortcodes available in the WP eStore core plugin.

  • WP eStore Shortcodes & PHP Functions List
See the following section (Extra Shortcodes) for additional eStore shortcodes.

Extra Shortcodes Addon

Some people just like to go nuts with WordPress shortcodes and there is nothing wrong with that :). So if you are not satisfied with the default set of shortcodes that come with the WP eStore plugin then download and install the “Extra WP eStore Shortcodes” addon plugin and you will have access to many more cool shortcodes.

First, check the list of shortcodes and other functions that will be available to you when you use the extra shortcodes addon plugin from the PDF file below:

  • Extra WP eStore Shortcodes List

If you see a shortcode that you want to use then download the extra shortcodes addon from the addon download area of our customer only support forum

  • Addon download area

Feel free to make a suggestions for shortcodes that you need and we will try to add it in.

Available Email Merge Tags

The following tags can be used in the “Email Body” of the email that is sent out after a purchase (the tags will be replaced with the value dynamically):

  • {first_name} – First name of the buyer
  • {last_name} – Last name of the buyer
  • {payer_email}- Buyer email address
  • {product_details} – Lists the item name (with variation), quantity, currency and price of every purchased item.
  • {product_details_tax_inclusive} – Lists the item name (with variation), quantity, currency and price of every purchased item (tax inclusive).
  • {product_name} – Name of the purchased products (comma separated)
  • {product_link} – List of purchased products and corresponding encrypted download links for the products.
  • {product_link_digital_items_only} – List of purchased digital items with encrypted download links (The item is only listed if the product has a downloadable file)
  • {product_price} – Price of the purchased products (comma separated)
  • {product_id} – Product IDs of the purchased products (comma separated)
  • {download_life} – Duration the download links are valid for.
  • {shipping_info} – Buyer’s shipping address
  • {shipping_option_selected} – The selected shipping variation for the transaction
  • {store_pickup} – If store pickup option is used, then it shows “yes” or “no”
  • {product_specific_instructions} – Add the product specific instructions (e.g password for a PDF file) specified in the product to the email body.
  • {purchase_date} – The date of the purchase.
  • {transaction_id} – The unique transaction ID of the purchase.
  • {purchase_amt} – The amount paid for the current transaction.
  • {total_tax} – Total tax amount for this transaction.
  • {total_shipping} – Total shipping amount for this transaction.
  • {total_minus_total_tax} – The total amount minus the total tax.
  • {total_minus_tax_and_shipping} – The total amount minus the tax and shipping.
  • {coupon_code} – The coupon code that was used in the transaction.
  • {discount_amount} – Shows the discount amount.
  • {counter} – A numeric counter. Each time you make a sale this counter goes up by 1.
  • {ip_address} – Shows the customer’s IP address.

Filed Under: Additional Resources, Featured Tagged With: Usage, WordPress eStore

WordPress eStore and WishList Members plugin Integration

Integrating WishList with the WP eStore plugin is very easy. First you should read the integration scenario post from the following URL to get a visualization of what to expect from this integration though:

  • WP eStore and WishList integration scenerio

You also need to make sure that you have the latest version of WishList Members pluign. Move to the next section when you are ready to do the integration.

What Info will You Need?

You will need 3 pieces of information from WishList members plugin to configure a “Buy Now”, “Subscribe” or “Add to Cart” button that integrates with the WP eStore plugin. The info you need  are:

  1. The Post URL
  2. The Secret Word
  3. Membership Level SKU Number

All these information can be found on the “Integration” tab of the WishList members plugin (Select Generic System integration)

wishlist-members-generic-integration-menu

WP eStore Settings for WishList Members Integration

Step 1) Go to the “3rd Party Integration” tab from the settings menu of WP eStore plugin.

esotre-and-wishlist-members-integration-settings

Step 2) Check the “Enable Wishlist Members Integration” checkbox from the “WishList Integration Settings” section.

Step 3) Fill in the “POST URL” and the “Secret Word” in the corresponding fields and save the settings by clicking the “Update” button.

Step 4) When configuring an eStore product, use the Membership Level SKU (this is number that corresponds to a particular membership level of your WishList members plugin) in the “Reference Text” field under the Additional product details section of the product.

Now, when someone pays using that eStore product, the plugin will know which membership level to create for that user. Once the user makes a payment, the plugin will talk to the WishList members plugin to create a membership account and send an email which will have a link to complete the registration.

Handling the Thank You Page URL

The user needs to click on the unique link sent to them via email in order to complete the registration after payment. So you can send the users to a generic “Thank You” page (after payment) where you instruct them to check the email for the special registration link and click on it.

What to Do When You Have Multiple Membership Levels?

Create a new eStore product for each of your membership levels and use the corresponding SKU value of the level in the reference text field of the eStore product.

Filed Under: Integration Tagged With: Integration, membership integration, Wish List, WordPress eStore

WordPress eStore Product Categorization

You can categorize your products into groups to help your customers browse them easily.

eStore-product-category

Product Category Management Menu

Once you create a product category from the Category Management menu you can assign a product to that category when configuring the product details.

eStore-product-category-produts-menu

Assigning a Product to a Category

You can display all the product(s) from a particular category using a shortcode:

There are many more shortcodes available to utilize product categories. See the shortcodes list documentation for details.

I have created a demo category called “Prod Cat A” and assigned two products to this category. The products are displayed as the following when using the category shortcode.

Demo Product for Category
This is a demo product that belongs to Category A for demonstration.
Price: $10.00
Digital Product With Variation
This product demonstrates how you can configure a digital product with variation control that delivers different file based on the user's selection
Price: $50.00
License :

Read the following documentation to learn some advanced techniques for displaying products from a category on a WordPress page:

  • Display products on a page from a particular category with additional options

Filed Under: Installation and Usage Tagged With: Display All Products, display products from a category, Product Categories, product categorization, WordPress eStore

How to Add/Create a Subscription Button for Recurring Payment

Configuring a Subscription button for recurring payment and adding it to a post or page is very easy using the WP eStore plugin.

Please note that this documentation is for creating a PayPal subscription button only

Subscription payments for other payment gateways are handled via the payment gateway bundle addon. Refer to the documentation of that addon if you are creating a subscription button for a different gateway.

Creating A PayPal Subscription Button

Follow the steps below to create a subscription product/button in eStore plugin:

Step 1: Click on the “Add/Edit Products” menu in your WP eStore admin area to create a new product.

Step 2: Fill in the product details as you see fit. You can enter a descriptive price in the “Price” field of a subscription product. Example values:

  • 29 USD Per Month
  • 47 USD for 3 Installments
  • 7 Days Trial Then 19 USD Per Month

Step 3: Go to the “Subscription/Recurring Payment Specific Settings” section of this product and enter the subscription details correctly. Save the product when you are done.

Configuring a Subscription Payment

Step 4: Type the following shortcode to display a subscription button for this product on a WordPress post or page.

[wp_eStore_subscribe_button id="15"]

Replace ‘PRODUCT-ID’ with the actual id of the product (example: 15)

Example Subscription Button

The following Subscription button charges the customer $29.95 USD for the first 7 days Then $49.95 USD for each month, for 6 installments.

You can also display the subscription button using one of the fancy displays like the following:

Test Membership Subscription
Subscription button that charges the customer $29.95 USD for the first 7 days Then $49.95 USD for each month, for 6 installments
Price: $29.95

Feel free to hit the subscription button to see how it works.

Frequently Asked Questions

  • Can I customize the button image? – Yes, simply specify your custom button image URL in the “Button Image URL” field when configuring the product.
  • Can I display a subscription button using one of the fancy displays? – Yes, please check the shortcodes documentation to find a suitable shortcode.
  • Can the subscription be added to the shopping cart? – No, please see the “Notes” section at the bottom of this page for detailed explanation.

Example Values for a Subscription Button

Here are some examples showing you what values to use to create a subscription button

Example 1: To create a subscription button  that charges $27.00 USD for each month until canceled use the following values:

Trial Billing Amount -> (leave empty)
Trial Billing Period -> (leave empty)
Recurring Billing Amount -> 27.00
Recurring Billing Cycle -> 1 Month
Recurring Billing Count -> (leave empty)

Example 2: To create a subscription button  that charges $29.95 USD for the first 7 days Then $49.95 USD for each month, for 6 installments use the following values:

Trial Billing Amount -> 29.95
Trial Billing Period -> 7 days
Recurring Billing Amount -> 49.95
Recurring Billing Cycle -> 1 Month
Recurring Billing Count -> 6

How to Test A Subscription Payment

  • Please read this post before you test a subscription payment button.

Note:

Please note that the subscription payment cannot be added to the shopping cart. Why? because PayPal handles subscription payments through a different API than the normal one (Subscription payments are usually complex). How do you process two of the following payments together when you checkout using the shopping cart?

  • Charge the customer $29.95 USD for the first 7 days Then $49.95 USD for each month
  • Charge the customer $49.95 USD for the first 14 days Then $19.95 USD for each month, for 6 installments.

Also, PayPal will not process multiple subscriptions through the cart checkout API so if a customer added 5 subscriptions to the cart and then tried to checkout it will get stuck.

Filed Under: Installation and Usage Tagged With: Documentation, Paypal Subscription, WordPress eStore

How to Use Coupons/Discounts in WP eStore

Configuring the WP eStore to use Coupons is very easy. Simply go to the Coupons/Discounts menu, enable the usage of coupons and add a few coupons to the system so your customers can use it.

Screenshot of Coupons/Discounts Menu

You can create conditional coupons that are only applied to the shopping cart if it meets certain conditions. For example, you can create conditional coupons like the following:

  • Apply 20% discount if the total amount is greater than $50.00
  • Apply 25% discount if the total number of items in the cart is greater than 5
  • Apply a discount only on a certain product
  • Give free shipping if the total amount is greater than $100.00

Coupon Usage Demo

I have already configured two coupons “DEMOCOUP1” and “DEMOCOUP2” for demonstration. Add the following demo product to the shopping cart and apply one of these coupons to see how it works.

Demo T-Shirt 3
Demo T-Shirt 3
Variation control demo with different prices
Price: $20.00
Color :

Discounts only get applied to the product price (shipping price doesn’t get discounted). Also, coupons don’t stack up, only one coupon can be applied to the cart at a time (this is to make sure the customers can’t apply multiple coupons to exploit the system).

Applying Discount Via URL

Read this documentation to learn about the discount via URL feature.

Filed Under: Installation and Usage Tagged With: Coupons, Usage, WordPress eStore

  • « Previous Page
  • 1
  • 2
  • 3
  • 4
  • 5
  • 6
  • Next Page »

Your Shopping Cart

Shopping Cart Empty
Shopping Cart is Empty
Visit The Shop

Search

Featured Documents

Stylish Product Display Options for WP eStore WP eStore Quick Setup and Usage Video Tutorial WP eStore Shortcodes and Functions Reference WordPress eStore Plugin Features WordPress eStore Plugin Demo What Our Customers Have to Say About Our Products WordPress eStore WishList (Feature Suggestions) WordPress eStore Frequently Asked Questions (FAQ) How to Show Add to Cart buttons

Featured Plugins

wordpress_estore_icon
wordpress membership plugin icon
WP Express Checkout Plugin
Lightbox Ultimate Plugin
wordpress_affiliate_plugin_icon

Copyright © 2023 | eCommerce Plugins