WordPress Membership

Easy to use WordPress Membership plugin

  • Documentation
  • WP eMember Plugin
  • Projects
  • Home

WP eMember Plugin Features

Below is a list of the main features of the WP eMember Plugin:

Content Protection

  • Ability to selectively protect the posts, pages, categories and comments
  • Selectively protect full or section of a post or page.
  • Ability to set protection settings for posts and pages in bulk from eMember’s dashboard or set the protection of a particular WordPress post or page while editing/creating it in the editor
  • Ability to protect a section of a post or page for a specific member or for a membership level
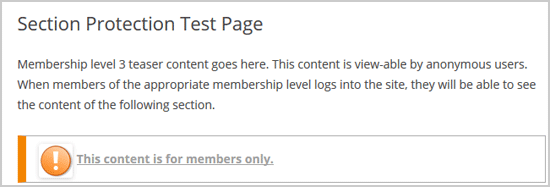
  • Teaser content – Ability to use “more” tag protection to create teaser content
  • Secure RSS feeds – Secure RSS feeds allow your members to view their membership material in their RSS reader
  • Login restriction by IP Address – If the number of login attempts from different IP addresses exceed the specified limit then the member’s account will be locked
  • Ability to disable simultaneous member login using the same member account details (two users cannot log-in to the same account at the same time). Helpful when you want to prevent member login sharing
  • Domain Level/Sitewide Lockdown – ability to restrict anonymous visitor access to your site at a domain level (the site won’t even load unless the visitor logs in as a member). The only page the visitor will be able to access on the site when not logged in is the “Join Us” page.
  • Ability to use download folder protection option (users will need to provider their login credentials to download any file from the protected folder)
  • Google First Click Free (GFCF) – eMember lets you use Google First Click Free feature so your protected content can be indexed by Google search if you want (view full details).
  • You can make it to where only your members can comment on the site but everyone else can see the comments.

Membership Options

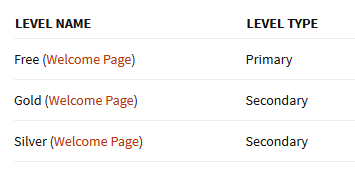
  • Unlimited membership levels – Your membership site can have as many “levels” as you need
  • Unlimited members. You can have an unlimited number of members with the eMember plugin
  • Multi-level access option – Give your members access to multiple levels within your membership site.
  • Flexible membership options- eMember gives you the flexibility to create different types of membership levels. Example, free, trial, and paid memberships
  • A member can buy multiple membership levels. In this scenerio the member will be able to access content from all the different membership levels that he/she purchased.
  • Subscription length control. You can control the length of each member’s access to your membership site.  A membership will automatically expire when the set time has been reached (e.g. 7 days, 1 month, 1 year etc)
  • One time payment membership option – if you do not want to offer a subscription based membership then you can use the one time payment option (example, a once off payment of $49.95 for a full year membership)
  • Ability to configure membership level expiry using a few different options. For example, expire after XX number of days or expire on a fixed date or expire when subscription is cancelled etc.
  • Auto Upgrade – You can setup scheduled upgrade of member’s membership level (e.g a member of silver membership will be automatically upgraded to gold membership after 1 month). This model can be used to drip content or deliver course materials to students in a timely fashion
  • Ability to manually approve members after they register. Members will not be able to log in until you manually approve their account
  • There is also an option to send members an email when you approved their accounts.
  • Ability to schedule automatic renewal email notice to the members before their membership account gets expired
  • Ability to bulk send emails to your members

Setup and Design

  • Simple installation with new and existing WordPress blog – Turn your existing or new WordPress blog into a membership site by simply installing the WP eMember and configuring a few basic settings.
  • Fully automated membership system.
  • Source code is non-encrypted – If you are a developer and would like to make customizations for your install then you are welcome to do so.
  • Ability to customize what fields show up on the registration and edit profile forms
  • Easy member management. You can easily view your members, their registration status, membership level etc.
  • Bookmarking feature – your members can bookmark their favourite posts and pages then view their bookmarks later.
  • Login redirection – Control the first page your members view when they login. You can specify a different redirection page for each membership level. This is very useful for adding welcome messages, information for that membership level, updates, news and events etc.
  • Membership login can be placed in a post, page, or sidebar.
  • Ability to show your member profiles to other users of the site.
  • Ability to display various details of the logged in member using shortcodes.
  • You can save hidden admin notes for each member that is only visible to admin of the site.
  • Ability to configure auto “account expiry” reminder notification email.
  • It can automatically send emails to your members whose accounts are about to expire.
  • It can automatically send emails to your members whose accounts have expired.
  • Compatible with the current version of WordPress.
  • Lightweight – WP eMember is a lightweight and easy to use membership plugin.
  • WP eMember is compatible with all properly coded (valid xHTML code) themes.
  • Ability to display a list of all the membership level(s) that belong to a user (very handy if you use the multiple membership levels per user feature).
  • Shortcodes to display your members list to other users.

Admin Dashboard

  • You can set which user roles can access the admin dashboard side of eMember. The user with “admin” permission can access the admin dashboard by default.
  • The members menu shows you all the members who have signed up.
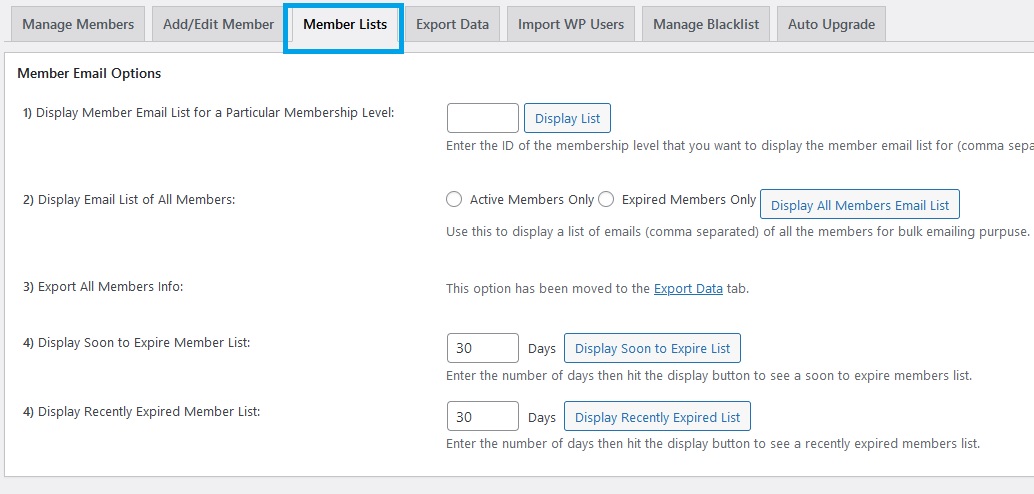
  • You can quickly view a list of all members or just your active members.
  • You can view a list of soon to expire member accounts of your site.
  • Ability to export all your members profile data to a CSV file.
  • You can filter the list by membership level and search member records from this interface.
  • Ability to edit any member’s information by clicking the “edit” link.
  • Ability to manually add member data via the “Add Member” interface.
  • You can generate a comma separated email list of your members (for email marketing purpose)
  • The members interface also lets you manage user blacklisting.
  • The membership level interface lets you configure membership levels and allows you to apply content protection for each levels you have.
  • There is an Admin Functions interface that has various little utility type functionality. These functionalities can be handy when running a big membership site.
  • The settings interface lets you enabled/disable various features of the plugin.

Member Login Related

  • Ability to place the member login widget anywhere on your site
  • Ability to use a compact login option (view more details)
  • Ability to use a Fancy login option (a login window pops up when the login link is clicked). There are two different fancy login options for you to choose from
  • Ability to setup an after login redirection page (this allows you to set the first page your members see when they login). You can also customize this on a per membership level basis so that members from different membership levels can have different after login landing page
  • Option to automatically log your member into the site right after the registration
  • Ability to force your members to re-authenticate after XX minutes of browsing. When you enable this feature the members will get logged out after XX minutes from their sign in time and they will need to re-login
  • User login restriction by IP address
  • Disable simultaneous user/member login
  • WordPress shows an admin toolbar at the top of the site to the users that are logged in (this can be confusing for some members). Our plugin has an option to hide that admin toolbar in the front-end of your site.

Member Registration Form

  • Ability to customize what fields are included in the member registration form
  • Ability to add custom registration fields to the member registration form (view more details)
  • Real time registration form field validation
  • Single registration form for all types of membership to help you keep a clean and simple setup.
  • Ability to show a terms and conditions checkbox in the registration form. Users have to agree to your terms before they can become a member.
  • Ability to setup an automatic after registration redirection (can be used to redirect the user to a specific page just after they complete the registration)

Integration Option

  • Pre-integrated with the WP eStore plugin. This allows you to accept membership payment via any payment gateway supported by eStore. You can also display a member’s purchase history when they make purchases using eStore.
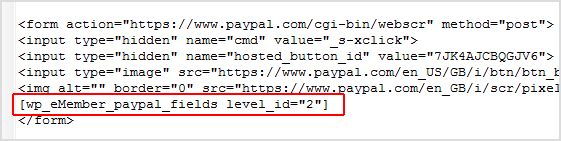
  • Simple PayPal button integration. You can use the eMember with a simple PayPal button for one time payments and recurring payments
  • Braintree payment gateway integration to accept membership payment via Braintree.
  • ClickBank Integration.
  • Integrates easily with BBPress 2.0+ forum plugin. View details here.
  • Can be integrated with AWeber, MailChimp, GetResponse to automatically sign up the members to your Autoresponder list when they register for a member account
  • Can be integrated with the MailPoet Newsletter plugin to signup your members to that plugin’s list.
  • Can be integrated with WooCommerce so you can sell membership access via WooCommerce products.
  • Can be integrated with any plugin that uses WordPress user role/capability feature. View detail here.

Miscellaneous

  • Free technical support – please see our support options here
  • Free lifetime plugin updates

Check the following video for a feature tour of WP eMember:

Visit the WP eMember (WordPress Membership) plugin page.

Filed Under: Additional Resources Tagged With: Features, WP eMember

How to Display a Member’s Purchase History

You can create a WordPress page and use the following shortcode on it. This shortcode will display all the membership levels (both primary any secondary levels) that a member has in his/her profile.

[wp_eMember_my_membership_levels]

Here is an example of what it will show:

You can also show the welcome page of each membership level using this shortcode (if you have one for your membership levels). Use the following shortcode to list the membership levels a user purchased with a link to the respecting welcome page of that level:

[wp_eMember_my_membership_levels show_welcome_page="1"]

The above shortcode will produce an output like the following example:

show-members-purchased-levels-with-welcom-page

Using a Purchase History for WP eStore Products

When a member makes a purchase through eStore while logged in, it will be recorded. The member can then view his/her purchase history.

You can use the following shortcode on a post or page to display a member’s purchase history:

[wp_eStore_members_purchase_history]

It will display the purchase history of the member who is logged in and viewing that post or page. Please note that the purchase history only works for purchases done via the eStore plugin so you will need to have both eMember and eStore installed on your server (the above shortocode is actually an eStore shortcode).

The purchase history looks similar to the following screenshot:

members-purchase-history-sc

Screenshot of a Member’s Purchase History

So, ideally you will create a page called “Purchase History” and place the above shortcode on the page then protect the page from the “General Protection”. Now, give the other membership levels access to this page which will allow the logged in members to view their purchase history.

Display Member’s Purchase History With an Option to Download

You can use the following shortcode on a post or page to display a member’s purchase history with an option to download the purchased files

[wp_eStore_members_purchase_history_with_download]

This will let your members see their purchase history and download any item they previously purchased.

Filed Under: Design & Usage Tagged With: Purchase History, WP eMember

How to Integrate WP eMember with AWeber

The WP eMember membership plugin can be easily integrated with AWeber (Email marketing and Autoresponder service) so that your members get signed up to your AWeber list when they register for an account.

AWeber recently added the capability to add subscribers to a list via their API. We have updated the eMember plugin to use this new API for AWeber integration.

AWeber Integration Steps

Step 1) Make a Connection to the AWeber API

First, you need to connect with the AWeber API. In order to connect eMember with the AWeber API, go to the eMember Settings -> Autoresponder Settings menu and authorize the “Tips and Tricks HQ” app.

Click on the “Make Connection” button to start the process (see the following screenshots).

After you hit the “Make Connection” button you should see a message saying “AWeber Authorization Success” given you provided the correct authorization code. Save the settings.

Step 2) Enable the Integration

Make sure you have checked the “Enable AWeber Signup” option in the settings to enable the AWeber integration.

Step 3) Specify the AWeber List Name/ID

Next, you need to specify the AWeber list name/ID so the plugin knows which list it should signup the members.

Below is an example of how an AWeber list name/ID looks like (you get the list ID value from your AWeber account):

awlist1234567

You can specify a Global list name in the “AWeber List Name” settings field so all members get added to that list. Remember to save the settings after you make changes.

Alternatively, you can signup your members to different AWeber lists based on their membership level also. For membership level specific signup, specify the list name in the “Autoresponder List/Campaign Name” section of the membership level in question.

Filed Under: Additional Resources, Integration Tagged With: 3rd party integration, AWeber, eMember Weber Integration, WP eMember

How to Use a Simple PayPal Payment Button to Accept Membership Payment

Please use the new instructions to create a PayPal button or use integrations with our WP Express Checkout plugin or WP eStore plugin.

A lot of people use the WP eStore plugin to create payment buttons for membership as it has a range of benefits but you can use a PayPal payment button (“Buy Now” or “Subscribe”) that you create in your PayPal account to accept payment for your premium members too.

Buy Now Type Button or Subscription Type Button?

  • Difference between “Buy Now” and “Subscription” type buttons for membership payment

Video Tutorial Showing PayPal Button Integration

Setup Preparation

To create a membership payment button using PayPal, you will need two pieces of information:

  • The URL of the IPN handling script
  • The ID of the membership level that you are creating this payment button for

The above two pieces of information will go in the “advanced variables” field of your PayPal button. WP eMember has a settings menu that will allow you to generate the advanced variables code easily so you can copy and paste it into your PayPal button.

Step 1) Go to the following area of your WP Admin dashboard:

eMember Settings -> Gateway Settings -> Direct PayPal Integration settings

Step 2) You can find the ID of a membership level (example: 4) in the “Membership Level” menu of the WP eMember plugin.

Enter the Membership level ID in the appropriate box then hit the “Generate Code” button to generate the advanced variables code that you need to use in your PayPal button.

The advanced variables code it generates for your site should look something like the following (you will need to copy this code so you can use it in your PayPal button):

notify_url=http://www.your-domain.com/?emember_paypal_ipn=1
custom=subsc_ref=4

Specifying the “Advanced Variables” Code in the PayPal button

When you create your button on PayPal from the “Merchant Services” menu, you will be able to specify some advanced variables in “Step 3”.

Specify advanced variables

Specify advanced variables

  • Check the add advanced variables checkbox
  • Copy and Paste the text from the notepad saved earlier into the textarea.

Now, you can copy the button code that PayPal gives you and paste it in your “Membership Payment” page. When someone makes a payment using this button it will automatically create a membership for the membership level that is specified in the button.

Your PayPal Profile Settings

Make sure that the Instant Payment Notification (IPN) is enabled in your PayPal profile (this is enabled by default). You can enable it by going to the profile menu in your PayPal account.

If the IPN is disabled in your PayPal Profile then PayPal won’t send any payment notification to eMember after payment. This will cause the registration process to not work as usual and your users who pay you won’t get any email form eMember.

Creating a Thank You Page

You should create a generic thank you page for your membership site. Use this page as your return page in the PayPal button (so the user goes to this page after the payment).

Explain what the user can expect next in this “Thank You” page. Instruct your users to check their email and click on the link to complete the paid membership registration.

The following is an example of the type of message you should put on your thank you page:

You will receive an email shortly which will contain the details of this transaction.

You will also receive an email containing a special link. Click on that link in the email to complete your paid membership registration.

Advanced Integration with a PayPal Button (An Alternative Integration Option)

This section is only for users who are looking for an advanced integration option.

If you want to create a PayPal button that both your new users or existing members can use to pay or renew membership then use the following option. This is also useful when you want your existing members to be able pay using a different PayPal account or email address. It can also track the affiliate commission if you are using our affiliate platform plugin.

Step 1) Edit your PayPal button and remove any value from your PayPal button’s advanced variables section. If you are creating a new PayPal button then you can skip this step.

Step 2) Edit the WordPress page where you will add the PayPal button code for membership payment.

Step 3) Add the following shortcode inside your PayPal button’s HTML code.

[wp_eMember_paypal_fields level_id="2"]

In this example, 2 is the membership level ID for this button so you will need to change it for your site.

Your final PayPal button code on the page should look something like the following example:

paypal-button-integration-advanced-example

It works just like a normal membership payment button for new users. However, when your logged-in members use this PayPal button to Pay, it will upgrade their existing membership profile to the newly paid level or renew the existing level. It will also work with affiliate tracking (if you are using our affiliate tracking plugin).

Video Tutorial (Using a PayPal Buy Now Button)

Video Tutorial (Using a PayPal Subscription Button)

Note: Once the button code is generated in your PayPal account, make sure that it is not “protected” (Click the Remove code protection option if it is encrypted). You also need to make sure that the website tab is selected (not Email) so PayPal shows you the full button code.

Filed Under: Design & Usage Tagged With: membership payment, paypal, plain paypal button

WP eMember Quick Setup and Usage Video Tutorial

You should watch all the following video tutorials to familiarize yourself with the basic functionality of the WP eMember plugin.

1. WP eMember Installation

2. Basic Configuration and Setup a Free Membership Site

This video tutorial shows you how to quickly setup the plugin to protect content that is available only for members (Membership is free)

3. How to Setup a Premium Membership Site using PayPal Button

This video tutorial shows you how to quickly setup the plugin to protect content that is available only for premium/paid members (Membership is not free).

4. How to Setup a Premium Membership Site using WP eStore Plugin

This video tutorial shows you how to quickly setup the plugin to protect content that is available only for premium/paid members (using WP eStore plugin to process the membership payment).
Note: This tutorial uses WP eStore plugin to create the payment buttons but you don’t have to use eStore (You can use a standard PayPal button to create the payment buttons… see video number 3)

5. How to Manage Content Protection in eMember

Other Miscellaneous Tutorials

A. Very Basic Example of Setting up Free Membership

WP eMember Basic Setup

B. Basic Example of eStore and eMember Integration

WP eMember Premium Membership

C. Apply Content Protection in eMember

WP eMember Manage Content Protection

What’s Next?

We have a lot of usage documentation for the membership plugin so go over the documentation at your own pace.

Filed Under: Video Tutorial Tagged With: eMember video, Video Tutorial

WP eMember Shortcodes and Functions Reference

This PDF file that you can download from this page has a list of all the available Shortcodes and PHP functions that you can use to display the login form, registration form etc.

Download the WP eMember shortcodes list file

Filed Under: Design & Usage Tagged With: email tags, function reference, shortcodes

How to Use the Bookmarking Feature in WP eMember

The WP eMember plugin has a bookmarking feature that you can optionally enable from the settings menu of this plugin. When this feature is enabled your members will be able to bookmark their favorite articles on your site for easy access later.

When enabled members will see the following icon at the top right hand corner of every post and page which can be used to bookmark that article:

add-bookmark-icon

When they click on it the article will be bookmarked and icon will change to the following:

article-bookmarked

Members who are not logged in won’t be able to bookmark and they will see the following icon:

not-logged-in

A member will be able to access all his/her bookmarks from a page where you add the following shortcode (Create a WordPress page and place the following shortcode in it):

[wp_eMember_user_bookmarks]

Once you add the above shortcode on a page it will list all the bookmarks of the member who is viewing that page:

members-bookmarks

Manage Bookmarks Screenshot

Members can easily access any articles that they bookmarked previously from this page. They can also remove bookmarks from this page.

You can see how this feature works on the eMember demo site.

Filed Under: Design & Usage Tagged With: Bookmarking Feature, member bookmarks, WP eMember

Typical Member Registration Flow (Signup Scenarios)

WP eMember was designed in a way so you (as the admin) have some customization freedom as to how the membership registration/signup flows on your membership site.

It is a good idea to read this post first and make up you mind on how you want your registration process to flow before you start setting eMember up.

If you are not sure about the difference between a “Join Us” page and a “Registration” page then read this post first.

The registration process is the same for all membership types, except for the free option (if you choose to offer it). The “Free Membership” signup is slightly different since it does not involve any payment.

WP eMember uses one registration page for all types of membership registration (there is no need to create multiple pages for multiple different membership levels). Full details of how WP eMember does this is explained here.

Table of Contents

  • 1) Member Signup Scenario 1
  • 2) Member Signup Scenario 2
  • 3) Member Signup Scenario 3 Extended with WP eStore

1) Member Signup Scenario 1

The basic member registration flow is similar to the following:

  1. Visitors land on your site.
  2. Want to become a member after seeing some of the awesome content.
  3. Follows the “Join Us” link.
  4. The above mentioned link will take them to the “Membership Join Us” Page where you have explained all the different types of membership you offer. It may look similar to the one here.
  5. From this page they can decide which membership option they want to choose (eg. Free, Silver, Gold or whatever you are offering)
  6. If they choose the “Free Membership” then they just follow the link and sign up for a free membership. Remember, the free membership sign up is only possible if you (the admin) allow free membership on your site.
  7. If they choose a “Paid Membership” then they make a payment by clicking on the payment button for the appropriate membership.
  8. Once the Payment is confirmed (at this point the plugin knows what type of membership this member wants), the plugin will create the appropriate membership account for this visitor.
  9. The member will receive an email that contains a “unique” link to complete the registration.
  10. When the member clicks on that link in the email it will let them choose a “username” and “password” and complete the registration. At this point the member can log into the site.

Step 9 and 10 are additional steps that allows the member to choose their own “username” and “password”. Many membership plugin just randomly creates a “username” and “password” for the member and completes the process at step 8. From my experience I know that most people do not like to receive random “username” and “password” assigned to them so in WP eMember I made sure the members can choose the login credentials.

2) Member Signup Scenario 2

In this registration scenario, you make the visitor signup for a basic free account before they make any payment for premium membership. If the visitor already has an account on the site then he can just log into the existing account and continue.

In short, this registration scenario looks like the following:

Create a free account -> Log into the site -> Make a payment for a paid level

The detailed steps below gives you (the site admin) an idea of what is involved in this scenario:

  1. Visitors land on your site.
  2. Want to become a member after seeing some of the awesome content.
  3. Follows the “Join Us” link.
  4. The above mentioned link will take them to the “Membership Join Us” Page where you have explained what you offer and how they can become a member. You instruct them to create an account first before they can make payment for any premium memberships (the payment buttons for the premium content are protected so only logged in members can view the buttons).
  5. After they create a free account they can log into the site and pay for a premium level (to get access to premium content).
  6. Once the Payment is confirmed (at this point the plugin knows what premium membership this member paid for), the plugin will simply update/upgrade the basic free account to the appropriate premium account level.

This registration flow is different than the one explained in “scenario 1” in the way that everyone who makes a payment already has a basic membership account so there is no need to prompt them to complete the registration by choosing a “username” and “password” as they have already done it when they created the basic membership account.

The following video show how this scenario works:

3) Member Signup Scenario 3 Extended with WP eStore

This registration flow is more suited for sites where you want to sell products only to members (registered users) of the site and you will be using WP eStore plugin to sell the product(s). Basically a visitor must have an account on your site to be able to purchase products (similar to amazon, iTunes etc).

  1. Visitors land on your site.
  2. Want to purchase some of the awesome products you have for sale.
  3. Adds a few product to the shopping cart.
  4. When they click on the “checkout” button it redirects them to a page that tell them that they need to have an account to be able to checkout or they can log in as a user if they already have an account.
  5. Creating an account is free and it’s quick so they sign up for an account and then log in to the newly created account. You can even enable the auto login after account creation feature so the user gets logged in automatically after account creation.
  6. Now they can continue to checkout and pay for the items.

To make WP eStore not let anyone continue to checkout unless they are logged in you simply have to check the “Only Logged In Members Can Checkout” field in the “AddOn Settings” tab of the WP eStore plugin.

Filed Under: Additional Resources Tagged With: WP eMember

How to Protect a Section of a Post or Page (Partial Protection)

If you want to protect a section or sections of a post or page then simply wrap the section with the “emember_protected” shortcode.

The following screenshot shows an example of how a partially protected page may look like. You can protect multiple sections of the post/page using multiple blocks of section protection shortcodes.

section-partial-content-protection-example

Section Protection Video Tutorial

Take a look at the following shortcode examples. It will show you how you can use the partial protection feature:

Note: When you copy and paste the shortcode, make sure to paste it in the “Text” mode of the page editor to prevent any HTML code from getting copied.

Simple Section Protection Example

[emember_protected]

Whatever content goes here is only visible to logged-in members who have access to this post or page.

[/emember_protected]

Section Protection for Specific Membership Level Example

[emember_protected for="2-3-4"]

Whatever content goes here is only visible to members who belong to the specific membership level specified above.

[/emember_protected]

Where 2,3,4 are the membership level IDs that you want to allow access to this section of content.

Section Protection for a Specific Member

[emember_protected member_id="1"]

Whatever content goes here is only visible to the member whose Member ID is 1.

[/emember_protected]

Section Protection for Anyone Who is Logged In

If you want to just protect a section of a post or page for logged in member (you don’t care if the member’s status is expired or not) then use the following shortcode:

[emember_protected scope="verified_users_only"]

Whatever content goes here is only visible to anyone who is logged-into the eMember system as a user (doesn't matter if his account is expired or not).

[/emember_protected]

Section Protection for Anyone Who is NOT Logged In

If you want to just protect a section of a post or page for non-logged in member (only anonymous visitors will see this section) then use the following shortcode (can be useful if you only want to show a message to the anonymous users):

[emember_protected scope="not_logged_in_users_only"]

Whatever content goes here is only visible to a non-logged in user (anonymous visitors of your site will see this message).

[/emember_protected]

Section Protection for Expired Members Only

If you want to just protect a section of a page for expired members (only expired members will see the message) then use the following shortcode:

[emember_protected scope="expired"]

Only the expired members will be able to see this message.

[/emember_protected]

If you want to protect a section of a page for expired members of a particular level then use the following shortcode:

[emember_protected scope="expired" for="2"]

Only the expired members from membership level 2 will be able to see this message.

[/emember_protected]

Section Protection without the “Content is protected” Message

If you want to protect a section of a post or page without showing the “Content is protected” message to the non-logged in users then use the following shortcode (can be useful if you don’t even want them to know that there is a section of content there):

[emember_protected for="2-3-4" do_not_show_restricted_msg="1"]

Whatever content goes here is only visible to members who belong to the specific membership level specified above. Also, the users who do not have access to this content won't see a "Content is protected" message.

[/emember_protected]

Section Protection without the Protected or Expired Message

The following section protection option protects the section without showing the “Content is protected” or “Account is expired” message (useful if you don’t even want them to know that there is a section of content there):

[emember_protected for="2-3-4" do_not_show_restricted_msg="1" do_not_show_expired_msg="1"]

Whatever content goes here is only visible to members who belong to the specific membership level specified above. Users who do not have access to this content won't see a "Content is protected" message. The expired members won't see the "Account is expired" message.

[/emember_protected]

Section Protection Not For Specific Membership Level

If you want to protect a section and make it NOT visible to a particular membership level then use the following shortcode:

[emember_protected not_for="1" do_not_show_restricted_msg="1"]

Whatever content goes here is NOT visible to members of membership level 1. All the other members can see this content.

[/emember_protected]

Using a Custom Message for the Non Members

This section protection shortcode can take another extra optional argument which can help you customize the text/message that is shown to non members.

Here is an example usage:

[emember_protected for="2-3-4" custom_msg='This is a custom message']

The content goes here. this content will be hidden and only available to members of membership level 2, 3 or 4.

[/emember_protected]

The following screenshot shows how this custom message is shown:

Section Protection Custom Message with HTML Link

You can use a HTML link in the custom message that you specify for the section protection shortcode. Remember to switch to the “Text” mode in the WordPress post/page editor if you are typing in HTML link code.

Here is an example shortcode usage:

[emember_protected for="2-3-4" custom_msg='This is a <a href="http://www.example.com">test link</a>']

The content goes here. this content will be hidden and only available to members of membership level 2, 3 or 4.

[/emember_protected]

Note

Just remember that when you want to use section protection on a post or page you should not protect the full post or the category that the post belongs to. When you apply category protection for a category, all the posts in that category is fully protected (category protection overrides all the small section protections in the post).

Section Protection in Action

You can see an example of how the section content protection work on the eMember demo site.

Filed Under: Content Protection, Design & Usage Tagged With: create teaser content, membership protection, partial content protection, protect section of a page, section protection, WP eMember

How to Get a List of Email Addresses of Your Members

Occasionally, you may require a list of email addresses belonging to your members for the purpose of sending bulk emails such as offers and promotions. WP eMember plugin facilitates this task by allowing you to obtain a comma-separated email list, which can be easily copied and pasted into your email campaign management software.

Step 1) Click on the “Members” menu from the “WP eMember” admin dashboard.

Step 2) Click on the “Member Lists” tab

Step 3) From this menu, you have the option to get the email list of all your members or for members from a particular membership level.

Filed Under: Design & Usage Tagged With: email list, WP eMember

  • « Previous Page
  • 1
  • …
  • 7
  • 8
  • 9
  • 10
  • Next Page »

Get the WP eMember Plugin

Get WP eMember

Categories

  • Additional Resources
  • Content Protection
  • Design & Usage
  • eMember Addon
  • Installation
  • Integration
  • License
  • Testing
  • Uncategorized
  • Video Tutorial

Recent Comments

  • admin on Giving a WordPress Admin User Access to All Protected Content
  • Ramona Hapjke on Giving a WordPress Admin User Access to All Protected Content
  • admin on Overview of the Available Content Protection Methods
  • Ramona Hapke on Overview of the Available Content Protection Methods
  • admin on Giving Other WordPress User Roles Access to Your WP eMember Admin Dashboard

Featured WordPress Plugins

WP Express Checkout Plugin
wordpress_estore_icon
wordpress membership plugin icon
wordpress_affiliate_plugin_icon

Copyright © 2026 | WP Membership Plugin