WordPress Membership

Easy to use WordPress Membership plugin

  • Documentation
  • WP eMember Plugin
  • Projects
  • Home

How to Use Multiple Membership Levels Per User

The default settings in WP eMember is to use one membership level per user at any given time. So every member of your site is assigned to one of the membership levels that you have created and the members can access content based on their membership level.

When members make a payment for a different membership level, their current level is upgraded to the one they just paid for (Example: upgrade from “Silver Level” to “Gold Level”). This is the setup that is used on most membership sites.

Table of Contents

  • Multiple Membership Levels Per User Feature
  • Showing a List of User’s Membership Levels
  • Customizing the Text/Labels
  • Multiple Membership Levels Feature Video Tutorial

Multiple Membership Levels Per User Feature

Depending on your situation, you may need to assign multiple membership levels to one user. So a member can have one or multiple membership levels in his profile. In this setup, the membership levels will stack. So for example, if someone belongs to “Membership Level A” and then he makes a payment for “Membership Level B” then he will end up with two membership levels in his profile (Level A and Level B). The member will be able to access content from both level A and B.

Do the following to use the multiple membership levels per user feature:

Step 1) Go to the general settings menu of eMember plugin.

Step 2) Check the “Enable Secondary Membership” field and save the settings.

Step 3) You can can assign additional membership levels to each of your members when you edit their profile:

If you have integrated the payment buttons with WP eMember already then when a logged-in member makes a purchase using that button, the membership level will be automatically added to their profile. The newly paid membership level will be set as the new main membership and the old one will be moved to the additional levels field.

Note: Even though a member can have multiple membership levels assigned to his profile, there will still need to be a primary membership level for the member. When you use auto upgrade it will work based on the primary membership level of the member.

Showing a List of User’s Membership Levels

If you enable the multiple membership level per user feature then you may want to show the users all the membership levels they have in their profile.

Create a new page and enter the following shortcode on this newly created page:

[wp_eMember_my_membership_levels]

You can also show the welcome page of each of the levels in the list by using the “show_welcome_page” parameter in the shortcode:

[wp_eMember_my_membership_levels show_welcome_page=1]

It will show all the membership levels of the logged-in user. Each level will also have a link to the “Welcome Page” of that membership level.

show-a-list-of-user-membership-levels-screenshot

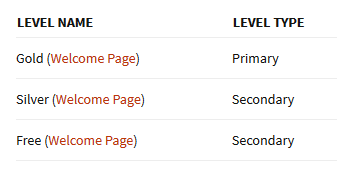
This will allow your members to easily go to the welcome page of all the membership levels they purchased.

Customizing the Text/Labels

You can use the following parameters in the “show membership levels” shortcode to customize the text labels:

level_name_label='Level Name'
level_type_label='Level Type'
primary_label='Primary'
secondary_label='Secondary'
welcome_page_anchor='Welcome Page'

Below is an example showing you how it is used:

[wp_eMember_my_membership_levels level_name_label='Membership' level_type_label='Membership Type']

Multiple Membership Levels Feature Video Tutorial

Filed Under: Design & Usage

How to Use Public Profile Listing (Member Directory Listing)

If you want to list all your members in a public directory style on a webpage so others can browse the list then use the “Public Profile Listing” feature.

New Way of Displaying Member Listing

We have created a free addon that can display a public profile listing of your members. This new extension is the preferred method of showing a user list on your site. Use this profile display extended addon to show your member list.

Old Way of Displaying Member/User Listing

The following documentation exists for backwards compatibility. It should not be used anymore to setup profile listing.

Step1: Enable this feature by checking the “Enable Public profile Listing” field in the settings menu of WP eMember.

Step2: Create a WordPress page and use the following shortcode to display the member list:

[wp_eMember_user_list]

This will show the member directory like the following:

wp-emember-public-profile-listing-sample

Public Profile Listing Sample

Clicking on an username will bring up the details of that user:

wp-emember-public-profile-listing-member-details-sample

Public Profile Details Sample

If you do not want to display the “Email Address” field then you can use the following shortcode to display the public profile listing which will keep the email address of the users hidden:

[wp_eMember_user_list no_email=1]

More Customization Option of Displaying Member Profile

If you need more customization options as to which fields gets shown then checkout the eMember profile extended addon.

Filed Under: Design & Usage Tagged With: Profile Listing, WP eMember

WP eMember Miscellaneous Tweaks

If you are a developer and want to customize the code or if you want to add conditions around your content then the following code examples should be helpful.

Find out if a member is logged in or not

You can use the following function call to determine if a member is logged in or not. The following function call will return true if a member is logged in (otherwise it will return false)

wp_emember_is_member_logged_in()

You can utilize the above function in the following way to ad code in your theme’s template file to add conditional block (for example: show a special message to your logged in users):

<?php if(wp_emember_is_member_logged_in()) { ?>
//Place your special message for members here
<?php } ?>

The following example can be useful if you want to show ad to non-members of the site:

<?php if(!wp_emember_is_member_logged_in()) { ?>
//Place your ad code here
<?php } ?>

The following example can be useful if you want to show a message to a member who belongs to membership level 1:

<?php if(wp_emember_is_member_logged_in('1')) { ?>
//Place your special message for members from membership level with ID 1
<?php } ?>

The following PHP code example shows how you can programmatically retrieve the member ID of a member and add condition:

<?php
$emember_auth = Emember_Auth::getInstance();
$user_id = $emember_auth->getUserInfo('member_id');
if (!empty($user_id))
{
    //pleace code that only members can see
}
?>

Hiding Post Title From Non Members

We will use the “wp_emember_is_member_logged_in” function (explained above) to modify the “Twenty Eleven” theme and make the post title only visible to users who are logged in.
This is an example for when a post is displayed on a single page – ie, I edited the content-single.php file:

The original line of code was as follows:

<h1 class="entry-title"><?php the_title(); ?>

To hide the post heading/title , I modified it as follows:

<h1 class="entry-title"><?php if(wp_emember_is_member_logged_in()) the_title(); ?>

The above is a simple example which will suppress the post heading if someone is not logged in.

Get member id and his/her membership level

<?php
$emember_auth = Emember_Auth::getInstance();
$user_id = $emember_auth->getUserInfo('member_id');
if (!empty($user_id))
{
    //User is logged in so add your conditional code here
    $membership_level = $emember_auth->getUserInfo('membership_level');
    if($membership_level == 1)
    {
        //Add stuff for this level
    }
}
?>

Get the homepage URL from the logged in member’s membership level

<?php
$emember_auth = Emember_Auth::getInstance();
$user_id = $emember_auth->getUserInfo('member_id');
if (!empty($user_id))
{
    //User is logged in so add your conditional code here
    $membership_level_resultset = $emember_auth->userInfo->primary_membership_level;
    $home_page_url = $membership_level_resultset->loginredirect_page;
    //Do something with this URL
}
?>

Show Logged in Member’s Username or other details

<?php
$emember_auth = Emember_Auth::getInstance();
$username = $emember_auth->getUserInfo('user_name');
echo "Username of the logged in member: ".$username;
?>

Check if the Logged in Member is Allowed to See a Post

<?php
$emember_auth = Emember_Auth::getInstance();
$post_id = "10"
if($emember_auth->is_protected_post($post_id))
{
    //This member is allowed to see this post
}

Retrieve Member’s Data

  • How to retrieve logged-in member’s data using a shortcode or PHP code
  • How to retrieve a particular member’s data using shortcode or PHP

Retrieve a Member Record Using the Username

The following PHP code will retrieve a member’s record for the given username:

<?php 
$username = "johndoe";//Replace with the actual username
$member = emember_get_member_by_username ($username);
echo "Member's First Name: " . $member->first_name; //Output the first name
echo "Member's Last Name: " . $member->last_name; //Output the last name
?>

Retrieve Total Members Count

The following PHP code will display the total members count:

<?php echo emember_get_total_members(array()); ?>

Member Registration Completion Hook

If you need to execute some custom code after a member completes the registration, use the following action hook:

  • Registration completion action hook

Show Different Navigation Menu to your Members and Non-members

  • Tweak your navigation menu to show dynamic menu items to members and non-members

Show Logged in Member’s Details Using Shortcode

You can use a shrotcode to show any details of the logged in member on a WordPress post or page. Refer to the eMember shortcode documentation for more details.

Placing a Registration Form For a Particular Membership Level to Give Backdoor Entrance

  • How to create a Registration Form for a Particular Membership Level

Free Members Must Confirm Their Email Address

  • How to make the free members to confirm their email address

Get the Login Page’s URL from the System

$emember_config = Emember_Config::getInstance();
$login_page_url = $emember_config->getValue('login_page_url');

Get the Registration Page’s URL from the System

$emember_config = Emember_Config::getInstance();
$login_page_url = $emember_config->getValue('eMember_registration_page');

Get the Edit Profile Page’s URL from the System

$emember_config = Emember_Config::getInstance();
$login_page_url = $emember_config->getValue('eMember_profile_edit_page');

Filed Under: Additional Resources Tagged With: member, Membership Level, membership tweaks, shortcodes, WordPress membership

How to Bulk Upload/Import Member Details from a CSV File

Update: You should use the bulk member data importer addon to import member data.

You can use the WP CSV to DB plugin to upload member details from a CSV file into the WP eMember’s database.

Before you use this method please note that if you want to import your WordPress users into eMember then there is an easier option for you. Simply browse to the “Import WP Users” tab from the “Members” menu and you will be able to import all your WordPress users into eMember.

Setup/Preparation

  • Install the WP CSV to DB plugin.
  • Download the members.csv template file and open it using Microsoft Excel.
  • Fill up the member details; One member per row (There are two example entries in that file so replace them with actual details).
  • Once you are done entering all your member details then save the file as a CSV file.

Specify the General Options

  • Enter 2 in the “Starting Row” field. This is the row number in the CSV file where you want the plugin to start reading from (the first row is the column titles so you want to read from the 2nd row)
  • Enter “wp_wp_eMember_members_tbl” in the “Database Table Name” field (this is the database table name for the WP eMember’s member table given you haven’t change the default database prefix of wordpress)
  • Enter the content of this text file in the “Column Names” field:

Specify the Input CSV file

Use the upload option to upload the CSV file created in the setup/preparation step.

Import into the Database

Hit the “Import to DB” button which will dump the member details from the CSV file into the database.

Now if you browse to the “Member” menu of WP eMember, you should see all the new members that you just added.

Note

This tool can’t handle importing of eMember custom fields. The primary purpose of this tool is to allow importing of some core member data.

Filed Under: Additional Resources Tagged With: Bulk Upload, emember addon, import, WP eMember

WP eMember and MailChimp Integration

The WP eMember (membership plugin) can be easily integrated with MailChimp (Email marketing and Email list manager). This allows you to add members to your MailChimp list as they join your membership site.

To integrate MailChimp with eMember simply go to the “Autoresponder Settings” tab from the Settings menu of eMember and set it up.

  1. Check the “Use MailChimp AutoResponder” field
  2. Specify your list name in the “MailChimp List Name” field
  3. Specify your MailChimp API Key that you can get from your MailChimp account
  4. Save the settings by hitting the “Update Options” button at the bottom of the page.

emember-mailchimp-autoresponder-integration-settings

You can also signup members of different membership levels to different MailChimp lists. You can do this by editing a membership level then specifying the list name for that level.

Using MailChimp Interest Groups

You can add interest groups when a member is added to your MailChimp list too.

Add the interest group data in the “Autoresponder List/Campaign Name” field of a membership level like the following:

List Name | groupname1, groupname2

Lets say you have the following scenario:

List Name: my-list-1
Interest Group Names: groupname1, groupname2

Then you would enter the following in the list name field of the eMember plugin:

my-list-1 | groupname1, groupname2

Filed Under: Design & Usage Tagged With: Autoresponder, WP eMember

How to Protect a Post or Page From the Editor

WP eMember allows you to protect a post or page while you are editing it. When you are editing or writing a new post simply scroll down to the “eMember Protection Options” section shown in the following screenshot and apply the protection you want (it will display all the membership levels you have configured on your site so you can easily pick which levels you want to give access to):

Protect Post or Page from the editor

Video Tutorial

Filed Under: Content Protection, Design & Usage Tagged With: membership protection, video protection, WP eMember

How to Customize Which Fields Appear on the Registration and Edit Profile Page

WP eMember plugin allows you to customize the fields that appear on the registration and edit profile page. You can choose to not display some of the fields depending on your site’s need.

In order to customize which fields appear on the form, go to the following settings/configuration area:

WP eMember Settings -> Pages/Forms Settings

The “Registration Form Fields” section in this menu page (see screenshot below) allows you to turn on/off certain fields from the registration page. You can also make certain fields required.

emember-registration-form-field-configuration

The “Edit Profile Form Fields” settings section allows you to configure fields that you want to show in the edit profile page.

Adding Custom Fields

If the default fields offered in eMember is not enough then you can add custom fields to the registration and edit profile form to collect extra data required for your business.

Go to the “Custom Field Settings” tab (from eMember settings menu) and configure the extra fields that you want to add. After you hit the “update options” button the extra fields will show up in the “Registration” and “Edit Profile” form on your site.

Note: the custom fields you add will show up on your registration and edit profile page directly… you don’t need to configure these fields from the “Pages/Forms Settings” section.

membership-custom-field-configuration-steps

Need More Custom Field Control?

We have an advanced eMember addon that has more custom fields controlling options.

Filed Under: Design & Usage Tagged With: customize registration fields, Usage Guide, WP eMember

Using a Compact Login and Join Us Message

You can use a compact login form if you want to display an “one line login and join us” message anywhere on your membership site. When a member logs in, it will display the name of the logged-in member and an option to logout.

For example, I have placed this compact login form on the header of my theme and it looks like the following to an anonymous visitor:

Compact Login Form Display (when not logged-in)

When a member logs into the site, it looks like the following to that user:

Compact Login Form Display (when logged-in)

How to Use the Compact Login Form?

You can use the following shortcode if you are placing it on a post or page:

[wp_eMember_compact_login]

If you are placing this on your theme’s template file then use the following PHP fuction where you want it to appear (example: header.php, footer.php etc):

<?php echo eMember_compact_login_widget(); ?>

Adding the Compact Login Form to the Sidebar

Here is how you can add the compact login form to your site’s sidebar widget:

#1) Add a standard text widget to your sidebar (where you want to show the compact login form).
#2) Use the following shortcode in the text widget:

[wp_eMember_compact_login]

#3) Save the widget.

Filed Under: Design & Usage Tagged With: Compact Login, WP eMember

How to Use the Auto Upgrade Feature to Drip Content

What auto upgrade does is that it upgrades the member of any membership level to another membership level automatically in the background based on what you have scheduled (you as the admin can schedule and setup these upgrade paths).

How Auto Upgrade Works

Auto upgrade works based on the time duration that you set in the configuration. This time duration is specified by the admin in the “Auto Upgrade” tab under the “Members” menu.

Auto Upgrade Starts Date

The auto upgrade date is calculated from a date value called the “Auto Upgrade Starts” date.

By default, the auto upgrade starts date value is set to the date the member registers on your site.

You can edit a member’s record from the admin side and view the value of this field (you can edit this value also if needed).

membership-auto-upgrade-starts-date-value

When you see a reference like “auto upgrade level after 7 days”, it means the level will be upgraded 7 days from the date you see in the “auto upgrade starts” date field.

Auto Upgrade Configuration

So for example, let’s say you have three membership levels:

  • Basic Membership
  • Premium Membership
  • Ultimate Membership

Now let’s say you have set the auto upgrade so that a member will get automatically upgraded to premium membership (from basic member ) after 7 days. This same member will get upgraded to the ultimate membership after 14 days.

Basic Membership -> Premium Membership = after 7 days
Premium Membership -> Ultimate Membership = after 14 days

If Joe signs up to the “Basic membership” on 1st January 2016, then he will get upgraded to the premium level on the 8th and then he will get upgraded to the ultimate level on the 15th.

If someone joins the “Premium Membership” on 10th January 2016, then he will get upgraded to the ultimate level on the 24th.

Once a member gets upgraded to the next level he/she gets access to the new content based on this new membership level. This is why this feature is very handy when you are developing a membership site that will be used to deliver an online course and you want to drip the course content over a period of time.

So using the above example model, if you want a member to be upgraded to “Premium Membership” after a week and then to “Ultimate Membership” after another week, the corresponding “number of days” value for the auto upgrade settings will be 7 and 14.

Important Note

It is important to keep in mind that the “number of days” value that you use when configuring auto upgrade settings is an absolute value from the “Auto Upgrade Starts” date. This value is not based on when a member’s account got upgraded to the next level.

Where is the Auto Upgrade Configuration Menu?

You can find the auto upgrade menu at the following location:

WP eMember -> Members -> Auto Upgrade

Auto Upgrade Configuration Video Tutorial

Filed Under: Design & Usage Tagged With: Auto Upgrade, Drip Content, WP eMember

How to Create Payment Buttons for Membership Upgrade or Renewal

If you have a membership site with multiple premium memberships then you probably want to offer your members an option to upgrade their account. Upgrading an account is very easy.

Creating Upgrade/Renewal Payment Buttons

1) Option A – PayPal Button for Membership Renewal/Upgrade

Step #1) Create a payment button the same way you created it for your membership joining page.

Step #2) Enter the URL of this newly created upgrade/renewal page in the “Membership renewal Page” settings field of the plugin and save the settings.

When a member wishes to upgrade his/her account, all this member has to do is click on the payment button and make the payment. After the payment, the plugin will use the payment email address to identify the correct member account and upgrade or renew the account automatically.

2) Option B – Using an eStore Button for Membership Renewal/Upgrade

Step #1) Create an eStore payment button the same way you created it for your membership joining page.

Step #2) Enter the URL of this newly created upgrade/renewal page in the “Membership renewal Page” settings field of the plugin and save the settings.

When a member wishes to upgrade his/her account, all this member has to do is click on this button and make the payment. After the payment, the plugin will use the payment email address to identify the correct member account and upgrade or renew the account automatically.

WP eStore’s payment buttons are a little more advanced than a standard PayPal button in the sense that it can carry more data. So when using an eStore button it is also possible to upgrade the member account that is logged into the site at the time of making the payment (In this case it doesn’t matter which email address the payment is coming from).

When logged-in members make a payment, the plugin will apply the payment to their exiting account profile.

What if the Member Account is Expired?

What about the members whose account is expired? They can’t log into the site anymore. We have thought about that too. Simply go to the eMember settings menu and check the “Allow Expired Account login” field from the “Account upgrade and renewal settings” section.

Don’t worry, just because they can log into the system doesn’t mean they can view the restricted content. Expired member accounts will not be able to view any protected content. They will see a message that tells them to renew the membership. You are allowing them to log into the system so the plugin can recognize their account profile.

The following screenshot shows where you can configure the renewal page within the plugin’s settings.

Adding More Flavor to Your Upgrade/Renewal Buttons

If you want to add a little bit of flavor to your membership upgrade path then create special payment buttons that are just like the payment button for the normal premium membership but with a discounted price. Then place it on a page that only premium members have access to. You can create a special page with all these discounted prices.

Now, your members can make payment using these buttons to upgrade their accounts at a discounted price. Since this page (that contains the buttons) can only be viewed by a premium member, an anonymous visitor won’t be able to signup at this special discounted price.

Filed Under: Design & Usage Tagged With: Account Upgrade, WP eMember

  • « Previous Page
  • 1
  • …
  • 6
  • 7
  • 8
  • 9
  • 10
  • Next Page »

Get the WP eMember Plugin

Get WP eMember

Categories

  • Additional Resources
  • Content Protection
  • Design & Usage
  • eMember Addon
  • Installation
  • Integration
  • License
  • Testing
  • Uncategorized
  • Video Tutorial

Recent Comments

  • admin on Giving a WordPress Admin User Access to All Protected Content
  • Ramona Hapjke on Giving a WordPress Admin User Access to All Protected Content
  • admin on Overview of the Available Content Protection Methods
  • Ramona Hapke on Overview of the Available Content Protection Methods
  • admin on Giving Other WordPress User Roles Access to Your WP eMember Admin Dashboard

Featured WordPress Plugins

WP Express Checkout Plugin
wordpress_estore_icon
wordpress membership plugin icon
wordpress_affiliate_plugin_icon

Copyright © 2026 | WP Membership Plugin