WordPress Membership

Easy to use WordPress Membership plugin

  • Documentation
  • WP eMember Plugin
  • Projects
  • Home

How to Manage Content Protection in WP eMember

You can manage the protection of specific posts, pages, categories, comments from the “Manage Content Protection” menu of the eMember plugin. You can also set protection of a post or page while editing it in the WordPress editor.

Quick Summary of Content Protection

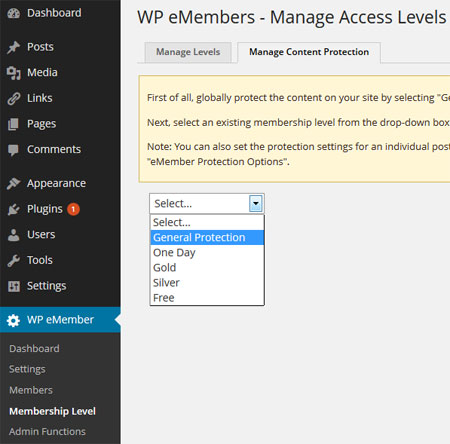
You perform the following operations in the “Manage Content Protection” menu to protect content in eMember.

  1. Lock-down the content you want to protect via General Protection. Select the items you want protected while you have “General Protection” selected from the dropdown menu.
  2. Then select a membership level from the dropdown menu and select items you want accessible to that membership level. Do this step for all the membership levels.

Content Protection Video Tutorial

WP eMember Manage Content Protection

Content Protection Written Instruction

It is important to understand how the protection mechanism works. There are two steps to protecting and giving access to specific content:

  • First you need to protect the content by selecting “General Protection” from the drop down menu and checking the checkboxes next to the posts, pages, categories,comments that you want to protect (don’t forget to hit the ‘Set Protection’ button).
  • Now that you have all the important content locked down, you can start to selectively give access to it according to the membership levels. Select a membership level from the drop down menu and check the checkboxes next to the posts, pages, categories, comments that you want the members of this membership level to be able to view (Don’t forget to hit the Grant Access button).
WP eMember Content Protection Management

WP eMember Content Protection Management

To protect content for a specific membership level simply select the membership level from the drop down menu and check the checkbox next to the individual posts, pages, categories that you want to give acess to.

Selective Content Protection for Different Membership Levels

Selective Content Protection for Different Membership Levels

The easiest way to manage content protection is through the protection of “Categories”. It allows you to give access to all the posts or pages under a certain category without having to individually select each post or page. So for example, you can create a category called “Basic” and put all the posts and pages under this category that you want to give access to for the “Basic” Membership level.

Protecting a Section of a Post or Page

  • WP eMember Protection – How to Protect a Section of a Post or Page

Site Wide Content Protection

  • WP eMember Protection – How to Enable Site Wide Protection

Protecting Posts or Pages From the Editor

  • How to Protect a Post or Page From the WP Post Editor

Filed Under: Content Protection, Design & Usage Tagged With: Membership Level, membership protection, partial content protection, Usage, WP eMember

How to Add a Membership Level in WP eMember

WP eMember uses a concept of membership levels. This feature is designed to give you, the site owner, the ability to easily control and assign what content your members can and cannot access on your site.

Table of Contents

  • What is a Membership Level
  • Creating a Membership Level
  • Understanding the Account Expiry Condition
  • Managing Remaining Time After Subscription Cancellation (Prorating)
    • Remaining Time Setup Example:
  • Video Tutorial
  • Additional Resources

What is a Membership Level

When a visitor becomes a member, he is assigned to one of the membership levels you create in the plugin. The member will then have access to the site’s content based on the permissions you defined in the membership level.

The membership level also controls how long a member of that level has access to the content. For example: if you have created a level with a 60 day duration, then members who belong to that level will get access to the content for 60 days from the date they joined. After that time, their account will expire and they will need to renew or upgrade their account.

You can create as many membership levels as you want to. So create a membership level for each different variations of access that you need to offer on your site. Then you can assign members to a membership level based on the kind of access to content and expiry you want for them.

Creating a Membership Level

To add a new membership level, you need to browse to the “Membership Level” menu of the plugin.

emember-manage-membership-level-interface-1

From the “Manage Levels” tab you can click on the “Add New” button to add a new membership level.

wp-emember-plugin-add-new-level-interface

The Membership level addition menu has help text next to each field to guide you. You can edit or delete an existing membership level from this “Manage Levels” interface too.

Understanding the Account Expiry Condition

The expiry of a member’s account is controlled by the membership level assigned to that member. So the value that you set in the Subscription Duration field will control how the account will expire.

Read the following resources to get a better understanding of this so you can set the Subscription Duration value for a membership level according to your needs.

  • Manually activating expired account
  • Difference between Buy Now and Subscription buttons
  • Membership time after subscription cancellation

Managing Remaining Time After Subscription Cancellation (Prorating)

If you are using a subscription-type button for your membership to charge recurring payments and want the member to be able to use their remaining time after the subscription payment agreement is canceled, follow these steps:

To prevent immediate cancellation of a member’s account when a subscription is canceled, avoid using the “No Expiry or Until Cancelled” option for the membership level. Instead, set a duration value that matches or is one day more than the subscription period. This approach ensures that the plugin sets the account to “unsubscribed” upon cancellation, allowing the member to use the remaining subscription duration.

Remaining Time Setup Example:

Let’s say you are creating a subscription payment button to charge every 30 days. You can set a value of 31 days in the subscription duration field of the membership level configuration. The extra day acts as a buffer to ensure the payment gateway can process the recurring charge and notify the plugin before it deactivates the account. This creates a cycle of 31 days. It will ensure that the member will continue to have access for another 31 days after receiving a subscription recurring charge. As long as the recurring charges continue, the member will have access. If the subscription is canceled, the account will expire after the remaining days for the cycle.

Video Tutorial

Read the manage content protection documentation to learn how to apply protection to your content for different membership levels that you create.

Additional Resources

The following documentation is good to read if you want to configure notification email before account expiry:

  • Configure Notification Email Before Account Expiry
  • Email Before Subscription/Recurring Charges

Filed Under: Design & Usage Tagged With: Membership Level, Usage, Usage Guide

How to Setup the WP eMember Settings Page

The first thing you need to do after you activate the WP eMember plugin is head over to the settings menu page to configure some settings. Most of the settings fields are self explanatory and have help text next to it.

It is a good idea to read the Typical Membership Registration process documentation before you start setting up WP eMember plugin.

The settings/options menu for the WordPress eMember Plugin can be found on the left hand side of your wordpress dashboard similar to the following screenshot (on WordPress version 4.0 or above)

[Read more…]

Filed Under: Design & Usage Tagged With: Settings, Usage Guide, WP eMember

  • « Previous Page
  • 1
  • 2
  • 3
  • 4

Get the WP eMember Plugin

Get WP eMember

Categories

  • Additional Resources
  • Content Protection
  • Design & Usage
  • eMember Addon
  • Installation
  • Integration
  • License
  • Testing
  • Uncategorized
  • Video Tutorial

Recent Comments

  • Chris Brown on API – Querying A Member Profile Using HTTP GET or POST
  • admin on API – Updating A Member Account Using HTTP GET or POST
  • Chris Brown on API – Updating A Member Account Using HTTP GET or POST
  • admin on API – Updating A Member Account Using HTTP GET or POST
  • Andrea on API – Updating A Member Account Using HTTP GET or POST

Featured WordPress Plugins

WP Express Checkout Plugin
wordpress_estore_icon
wordpress membership plugin icon
wordpress_affiliate_plugin_icon

Copyright © 2025 | WP Membership Plugin