WordPress Membership

Easy to use WordPress Membership plugin

  • Documentation
  • WP eMember Plugin
  • Projects
  • Home

How to Use the Bookmarking Feature in WP eMember

The WP eMember plugin has a bookmarking feature that you can optionally enable from the settings menu of this plugin. When this feature is enabled your members will be able to bookmark their favorite articles on your site for easy access later.
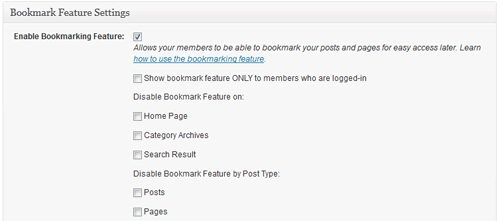
When enabled members will see the following icon at the top right hand corner of every post and page which can be used to bookmark that article:

add-bookmark-icon

When they click on it the article will be bookmarked and icon will change to the following:

article-bookmarked

Members who are not logged in won’t be able to bookmark and they will see the following icon:

not-logged-in

A member will be able to access all his/her bookmarks from a page where you add the following shortcode (Create a WordPress page and place the following shortcode in it):

[wp_eMember_user_bookmarks]

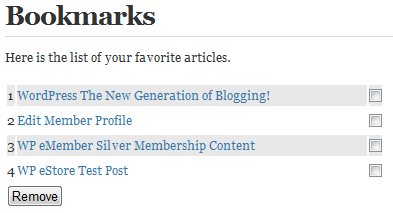
Once you add the above shortcode on a page it will list all the bookmarks of the member who is viewing that page:
members-bookmarks

Manage Bookmarks Screenshot

Members can easily access any articles that they bookmarked previously from this page. They can also remove bookmarks from this page.

You can see how this feature works on the eMember demo site.
Filed Under: Design & Usage Tagged With: Bookmarking Feature, member bookmarks, WP eMember

Typical Member Registration Flow (Signup Scenarios)

WP eMember was designed in a way so you (as the admin) have some customization freedom as to how the membership registration/signup flows on your membership site.

It is a good idea to read this post first and make up you mind on how you want your registration process to flow before you start setting eMember up.

If you are not sure about the difference between a “Join Us” page and a “Registration” page then read this post first.

The member registration flow is the same for signing up for any type of membership except the free one (if you want to allow free membership). The registration process for the “Free Membership” is slightly different because this one doesn’t have any payment involved.

WP eMember uses one registration page for all types of membership registration (there is no need to create multiple pages for multiple different membership levels). Full details of how eMember does this is explained here.

1) Member Signup Scenario 1

The basic member registration flow is similar to the following:

  1. Visitors land on your site.
  2. Want to become a member after seeing some of the awesome content.
  3. Follows the “Join Us” link.
  4. The above mentioned link will take them to the “Membership Join Us” Page where you have explained all the different types of membership you offer. It may look similar to the one here.
  5. From this page they can decide which membership option they want to choose (eg. Free, Silver, Gold or whatever you are offering)
  6. If they choose the “Free Membership” then they just follow the link and sign up for a free membership. Remember, the free membership sign up is only possible if you (the admin) allow free membership on your site.
  7. If they choose a “Paid Membership” then they make a payment by clicking on the payment button for the appropriate membership.
  8. Once the Payment is confirmed (at this point the plugin knows what type of membership this member wants), the plugin will create the appropriate membership account for this visitor.
  9. The member will receive an email that contains a “unique” link to complete the registration.
  10. When the member clicks on that link in the email it will let them choose a “username” and “password” and complete the registration. At this point the member can log into the site.

Step 9 and 10 are additional steps that allows the member to choose their own “username” and “password”. Many membership plugin just randomly creates a “username” and “password” for the member and completes the process at step 8. From my experience I know that most people do not like to receive random “username” and “password” assigned to them so in WP eMember I made sure the members can choose the login credentials.

2) Member Signup Scenario 2

In this registration scenario, you make the visitor signup for a basic free account before they make any payment for premium membership. If the visitor already has an account on the site then he can just log into the existing account and continue.

In short, this registration scenario looks like the following:

Create a free account -> Log into the site -> Make a payment for a paid level

The detailed steps below gives you (the site admin) an idea of what is involved in this scenario:

  1. Visitors land on your site.
  2. Want to become a member after seeing some of the awesome content.
  3. Follows the “Join Us” link.
  4. The above mentioned link will take them to the “Membership Join Us” Page where you have explained what you offer and how they can become a member. You instruct them to create an account first before they can make payment for any premium memberships (the payment buttons for the premium content are protected so only logged in members can view the buttons).
  5. After they create a free account they can log into the site and pay for a premium level (to get access to premium content).
  6. Once the Payment is confirmed (at this point the plugin knows what premium membership this member paid for), the plugin will simply update/upgrade the basic free account to the appropriate premium account level.

This registration flow is different than the one explained in “scenario 1” in the way that everyone who makes a payment already has a basic membership account so there is no need to prompt them to complete the registration by choosing a “username” and “password” as they have already done it when they created the basic membership account.

The following two videos show how this scenario works (the two videos show you things from two slightly different angles to give you a good perspective):

Video 1

Video 2

3) Member Signup Scenario 3 Extended with WP eStore

This registration flow is more suited for sites where you want to sell products only to members (registered users) of the site and you will be using WP eStore plugin to sell the product(s). Basically a visitor must have an account on your site to be able to purchase products (similar to amazon, iTunes etc).

  1. Visitors land on your site.
  2. Want to purchase some of the awesome products you have for sale.
  3. Adds a few product to the shopping cart.
  4. When they click on the “checkout” button it redirects them to a page that tell them that they need to have an account to be able to checkout or they can log in as a user if they already have an account.
  5. Creating an account is free and it’s quick so they sign up for an account and then log in to the newly created account. You can even enable the auto login after account creation feature so the user gets logged in automatically after account creation.
  6. Now they can continue to checkout and pay for the items.

To make WP eStore not let anyone continute to checkout unless they are logged in you simply have to check the “Only Logged In Members Can Checkout” field in the “AddOn Settings” tab of the WP eStore plugin.

Filed Under: Additional Resources Tagged With: WP eMember

How to Protect a Section of a Post or Page (Partial Protection)

If you want to protect a section or sections of a post or page then simply wrap the section with the “emember_protected” shortcode.

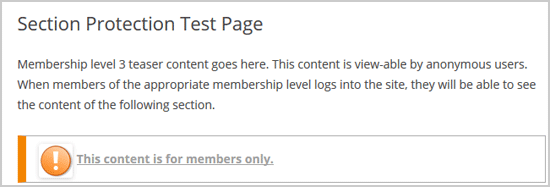
The following screenshot shows an example of how a partially protected page may look like. You can protect multiple sections of the post/page using multiple blocks of section protection shortcodes.

section-partial-content-protection-example

Section Protection Video Tutorial

Take a look at the following shortcode examples. It will show you how you can use the partial protection feature:

Note: When you copy and paste the shortcode, make sure to paste it in the “Text” mode of the page editor to prevent any HTML code from getting copied.

Simple Section Protection Example

[emember_protected]

Whatever content goes here is only visible to logged-in members who have access to this post or page.

[/emember_protected]

Section Protection for Specific Membership Level Example

[emember_protected for="2-3-4"]

Whatever content goes here is only visible to members who belong to the specific membership level specified above.

[/emember_protected]

Where 2,3,4 are the membership level IDs that you want to allow access to this section of content.

Section Protection for a Specific Member

[emember_protected member_id="1"]

Whatever content goes here is only visible to the member whose Member ID is 1.

[/emember_protected]

Section Protection for Anyone Who is Logged In

If you want to just protect a section of a post or page for logged in member (you don’t care if the member’s status is expired or not) then use the following shortcode:

[emember_protected scope="verified_users_only"]

Whatever content goes here is only visible to anyone who is logged-into the eMember system as a user (doesn't matter if his account is expired or not).

[/emember_protected]

Section Protection for Anyone Who is NOT Logged In

If you want to just protect a section of a post or page for non-logged in member (only anonymous visitors will see this section) then use the following shortcode (can be useful if you only want to show a message to the anonymous users):

[emember_protected scope="not_logged_in_users_only"]

Whatever content goes here is only visible to a non-logged in user (anonymous visitors of your site will see this message).

[/emember_protected]

Section Protection for Expired Members Only

If you want to just protect a section of a page for expired members (only expired members will see the message) then use the following shortcode:

[emember_protected scope="expired"]

Only the expired members will be able to see this message.

[/emember_protected]

If you want to protect a section of a page for expired members of a particular level then use the following shortcode:

[emember_protected scope="expired" for="2"]

Only the expired members from membership level 2 will be able to see this message.

[/emember_protected]

Section Protection without the “Content is protected” Message

If you want to protect a section of a post or page without showing the “Content is protected” message to the non-logged in users then use the following shortcode (can be useful if you don’t even want them to know that there is a section of content there):

[emember_protected for="2-3-4" do_not_show_restricted_msg="1"]

Whatever content goes here is only visible to members who belong to the specific membership level specified above. Also, the users who do not have access to this content won't see a "Content is protected" message.

[/emember_protected]

Section Protection without the Protected or Expired Message

The following section protection option protects the section without showing the “Content is protected” or “Account is expired” message (useful if you don’t even want them to know that there is a section of content there):

[emember_protected for="2-3-4" do_not_show_restricted_msg="1" do_not_show_expired_msg="1"]

Whatever content goes here is only visible to members who belong to the specific membership level specified above. Users who do not have access to this content won't see a "Content is protected" message. The expired members won't see the "Account is expired" message.

[/emember_protected]

Section Protection Not For Specific Membership Level

If you want to protect a section and make it NOT visible to a particular membership level then use the following shortcode:

[emember_protected not_for="1" do_not_show_restricted_msg="1"]

Whatever content goes here is NOT visible to members of membership level 1. All the other members can see this content.

[/emember_protected]

Using a Custom Message for the Non Members

This section protection shortcode can take another extra optional argument which can help you customize the text/message that is shown to non members.

Here is an example usage:

[emember_protected for="2-3-4" custom_msg='This is a custom message']

The content goes here. this content will be hidden and only available to members of membership level 2, 3 or 4.

[/emember_protected]

The following screenshot shows how this custom message is shown:

Section Protection Custom Message with HTML Link

You can use a HTML link in the custom message that you specify for the section protection shortcode. Remember to switch to the “Text” mode in the WordPress post/page editor if you are typing in HTML link code.

Here is an example shortcode usage:

[emember_protected for="2-3-4" custom_msg='This is a <a href="http://www.example.com">test link</a>']

The content goes here. this content will be hidden and only available to members of membership level 2, 3 or 4.

[/emember_protected]

Note

Just remember that when you want to use section protection on a post or page you should not protect the full post or the category that the post belongs to. When you apply category protection for a category, all the posts in that category is fully protected (category protection overrides all the small section protections in the post).

Section Protection in Action

You can see an example of how the section content protection work on the eMember demo site.

Filed Under: Content Protection, Design & Usage Tagged With: create teaser content, membership protection, partial content protection, protect section of a page, section protection, WP eMember

How to Get a List of Email Addresses of Your Members

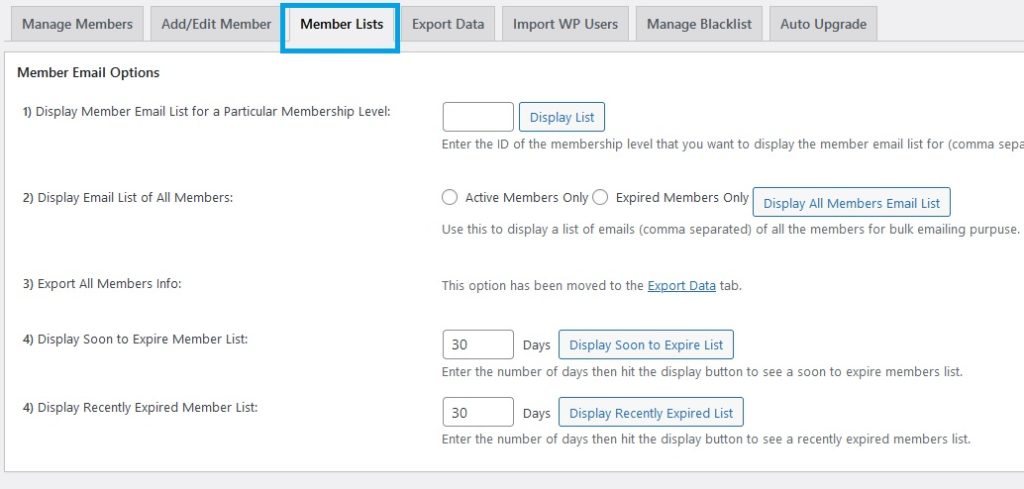
From time to time you will need a list of email addresses of your members for bulk emailing purpose (eg. send them offers and stuff). The eMember plugin lets you grab a comma (,) separated email list that you can copy and then paste in your email campaign management software.

1. Click on the “Members” menu from the “WP eMember” dashboard.

2. Click on the “Member Emails” tab

3. From this menu, you have the option to get the email list of all your members or for members from a particular membership level.

Get Member Email

Get Member Email

Filed Under: Design & Usage Tagged With: email list, WP eMember

WP eMember and WP eStore Integration for Membership Payment

The eStore and eMember plugins are pre-integrated so using a WP eStore button to accept payment for membership is very easy.

The only thing you need to do is specify the “Membership Level ID” in the eStore product’s “Reference Text” field when you create/configure a product in eStore.

This basically tells eStore which membership level a product corresponds to. You can create as many eStore products and payment buttons as you want for your different membership levels.

Here is a summary of the steps involved

Step 1) Create an eStore product. Our WP eStore documentation will show you how to do this if you don’t know it already (there are video tutorials for it too)

Step 2) Find a field called “Reference Text” when your are creating/configuring the eStore product. You can find this field under the “Additional Product Details” section of the product (see the screenshot below).

Specify the membership level ID in this reference text field.

Check the video tutorial from the “Video Tutorial” section below which will explain how this works in details.

Video Tutorial

Click on the following image to open the video tutorial:

WP eMember Premium Membership

Buy Now Type Button or Subscription Type Button?

Read the following documentation if you are not sure if you should use an ONE OFF payment button or a SUBSCRIPTION (recurring payment) button for your membership payment:

  • Difference between “Buy Now” and “Subscription” type buttons for membership payment

Example Scenario

Here is an example scenario,

You have a membership level called “Gold Pass”. The id of this membership level is 3 (The ID for each membership level is listed on the Manage Levels screen).

Say for example, you want to charge $25 for this membership level. Go to the “Add/Edit Products” menu of the WP eStore plugin so you can configure a payment button to accept payment from potential customers.

When you fill in the details of this eStore product, just specify 3 (Membership Level ID of Gold Pass) in the “Reference Text” field which is under the “Additional Product Details” section. Now, use an eStore shortcode to place “Add to Cart” or “Buy Now” button (for the product you just configured) on your Membership Payment/Join Us page.

When a member pays for the membership using this button the eStore plugin will know (from the Level ID you entered in the reference text) that this payment was for a “Gold Pass” and it will automatically create the appropriate member account and send an email to the customer.

The email sent to the customers will contain a unique link. When they click/follow that link, they will be brought to the registration page where they will be able to choose their Username and password to complete the registration and access the “members only” content.

If you have multiple membership levels then create an “Add to Cart” or “Buy Now” button for each membership level and place them on your Membership Payment/Join Us page following the above instructions.

Integration Troubleshooting

Check the following link if your integration is not working as expected:

  • WP eStore and eMember integration troubleshooting

Filed Under: Design & Usage, Integration Tagged With: Integration, WP eMember

How to Test the WP eMember Plugin to Make Sure Everything is Working

Setup Preparation

You will most likely have your WordPress admin dashboard open while you configure and test various things. So it is a good idea to use two different browsers for the testing. Use one browser (e.g Firefox) to open your WordPress admin dashboard and use the other one (e.g. Internet Explorer, Google Chrome) to simulate a visitor. The reason is that the temporary login information is stored in the browser’s session, so having two different browsers to do two different things is ideal and will avoid any login conflicts due to shared session.

Also, check the plugin testing checklist to avoid any common mistakes

Simple Registration Test

The simplest way to test the WP eMember plugin after you set everything up is to allow free membership and then visiting the registration URL to sign up for a free membership account. Here are some guidelines:

  • Create a post or page calling it “Free Member Content” and put some random content in it.
  • Create a Membership Level called “Free Membership” giving it access to the site’s content (posts, pages etc)
  • Now go to the “Manage Content Protection” menu and select the “Free Membership” level from the drop down.
  • Give this membership level access to the post “Free Member Content”.
  • Go to the settings menu and make sure the “Allow Free Membership” field is checked and the “Free Membership Level ID” field has the correct ID of the “Free Membership” level.
  • Now if you open a new browser window and try to access this “Free Member Content” post without being logged in as a member you should see something similar to the following:

Content is not displayed when logged in

  • Follow the “Join Today” link and go to the registration page to register for a free membership account.
  • Once you sign up use the “user name” and “password” for your free membership to log in.
  • If the login operation is successful you should see the content of the “Free Member Content” post/page.

This indicates that the content protection, member registration and login functionalities are setup correctly and it’s working fine.

Now you can take the testing one step further and try a test transaction by purchasing one of the paid membership (if you offer paid membership) to see how the paid membership registration part works.

Paid Membership Test

An easy way to test the paid membership flow is to do a live transaction with something like a $1 (you can change the price of the membership after the testing).

  • Create a membership payment button in the plugin for a small amount (example: $1). This documentation explain how to create a membership button for PayPal.
  • If are testing a new user paying for a membership scenario then make sure the email address you are going to use for the transaction isn’t already in the system. Go to the member’s menu and search for it to see if a user account already exists with that email address. If a member account exists then delete it before you do the transaction.
  • Do a transaction using your credit card (for example). You can refund that transaction after the testing is done.

The Typical Member Registration Flow article is a good resource to read.

Filed Under: Testing Tagged With: Testing, WP eMember

WP eMember License Agreement

WP eMember

End User License Agreement
Copyright, Tips and Tricks HQ (https://www.tipsandtricks-hq.com/)
All rights reserved.

This plugin uses the GNU General Public License. By using the software, you agree to be bound by the terms of GPL license. If you have any questions about the terms, please contact Tips and Tricks HQ for clarification.


Filed Under: License Tagged With: eMember License, WP eMember

How to Manage Content Protection in WP eMember

You can manage the protection of specific posts, pages, categories, comments from the “Manage Content Protection” menu of the eMember plugin. You can also set protection of a post or page while editing it in the WordPress editor.

Quick Summary of Content Protection

You perform the following operations in the “Manage Content Protection” menu to protect content in eMember.

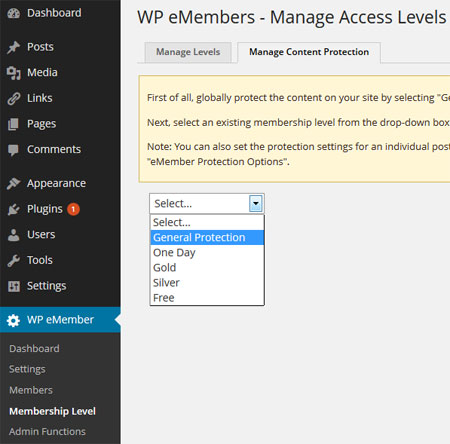
  1. Lock-down the content you want to protect via General Protection. Select the items you want protected while you have “General Protection” selected from the dropdown menu.
  2. Then select a membership level from the dropdown menu and select items you want accessible to that membership level. Do this step for all the membership levels.

Content Protection Video Tutorial

WP eMember Manage Content Protection

Content Protection Written Instruction

It is important to understand how the protection mechanism works. There are two steps to protecting and giving access to specific content:

  • First you need to protect the content by selecting “General Protection” from the drop down menu and checking the checkboxes next to the posts, pages, categories,comments that you want to protect (don’t forget to hit the ‘Set Protection’ button).
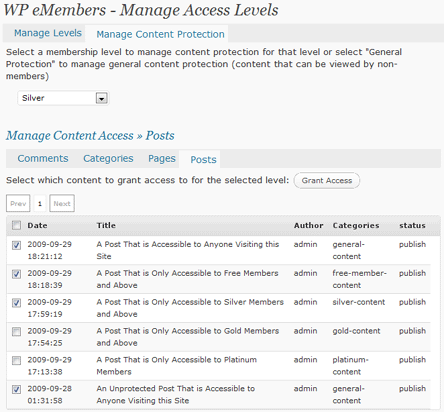
  • Now that you have all the important content locked down, you can start to selectively give access to it according to the membership levels. Select a membership level from the drop down menu and check the checkboxes next to the posts, pages, categories, comments that you want the members of this membership level to be able to view (Don’t forget to hit the Grant Access button).
WP eMember Content Protection Management

WP eMember Content Protection Management

To protect content for a specific membership level simply select the membership level from the drop down menu and check the checkbox next to the individual posts, pages, categories that you want to give acess to.

Selective Content Protection for Different Membership Levels

Selective Content Protection for Different Membership Levels

The easiest way to manage content protection is through the protection of “Categories”. It allows you to give access to all the posts or pages under a certain category without having to individually select each post or page. So for example, you can create a category called “Basic” and put all the posts and pages under this category that you want to give access to for the “Basic” Membership level.

Protecting a Section of a Post or Page

  • WP eMember Protection – How to Protect a Section of a Post or Page

Site Wide Content Protection

  • WP eMember Protection – How to Enable Site Wide Protection

Protecting Posts or Pages From the Editor

  • How to Protect a Post or Page From the WP Post Editor

Filed Under: Content Protection, Design & Usage Tagged With: Membership Level, membership protection, partial content protection, Usage, WP eMember

How to Setup the WP eMember Settings Page

The first thing you need to do after you activate the WP eMember plugin is head over to the settings menu page to configure some settings. Most of the settings fields are self explanatory and have help text next to it.

It is a good idea to read the Typical Membership Registration process documentation before you start setting up WP eMember plugin.

The settings/options menu for the WordPress eMember Plugin can be found on the left hand side of your wordpress dashboard similar to the following screenshot (on WordPress version 4.0 or above) [Read more…]

Filed Under: Design & Usage Tagged With: Settings, Usage Guide, WP eMember

WP eMember Installation & Upgrade Instructions

Installing and Upgrading WordPress eMember plugin is very easy. The installation of this plugin is similar to all the other WordPress plugins.

Fresh Plugin Installation

  • Go to the Add New plugins screen in your WordPress admin area
  • Click the Upload Plugin button
  • Browse for the plugin file (wp-eMember.zip)
  • Click Install Now and then activate the plugin

Plugin Upgrade

Before you ask…

Yes, the plugin will retain all the previous information that you saved. No data (your member details, settings values etc.) will get lost during the upgrade.

Important Note 1: If you have a live site where customers are constantly making purchases, then it is a good idea to install the new version of the plugin on a test WordPress site first to minimize any chance of upgrade related issue taking you out by surprise. Most people prefer to have a test WordPress installed in one of the sub-directories (you can install it in a sub-domain too). This way if you face an issue due to the upgrade, you can report it to us and while we work on it, your main site won’t be affected.

Important Note 2: Some people have this bad habit of keeping multiple copies of the same plugin in the “plugins” directory. This is the source of many problems. Please note that you should only have one version of any WordPress plugin in the plugins directory. If you want to keep backups, then you can keep it in your “uploads” directory or on your computer’s hard drive.

With that said, please follow the instructions below when upgrading the WordPress eMember plugin from an older version to a newer version:

Preparation: This is optional (unless you have made custom modifications) but it is a good idea to keep a backup of the currently installed version before you upgrade to the latest version.

  1. Deactivate the currently installed version of the “WP eMember” plugin from the Plugins menu.
  2. Delete the current version of the WP eMember plugin from the Plugins menu.
  3. Upload the new version of the plugin.
  4. Activate the newly uploaded plugin.

Video Tutorial

Filed Under: Installation Tagged With: WP eMember

  • « Previous Page
  • 1
  • …
  • 3
  • 4
  • 5

Get the WP eMember Plugin

Get WP eMember

Categories

  • Additional Resources
  • Content Protection
  • Design & Usage
  • eMember Addon
  • Installation
  • Integration
  • License
  • Testing
  • Uncategorized
  • Video Tutorial

Recent Comments

  • Chris Brown on API – Querying A Member Profile Using HTTP GET or POST
  • admin on API – Updating A Member Account Using HTTP GET or POST
  • Chris Brown on API – Updating A Member Account Using HTTP GET or POST
  • admin on API – Updating A Member Account Using HTTP GET or POST
  • Andrea on API – Updating A Member Account Using HTTP GET or POST

Featured WordPress Plugins

wordpress_estore_icon
wordpress membership plugin icon
WP Express Checkout Plugin
WordPress Lightbox Ultimate Plugin
WordPress Photo Seller Plugin
wordpress_affiliate_plugin_icon

Copyright © 2023 | WP Membership Plugin