WordPress Membership

Easy to use WordPress Membership plugin

  • Documentation
  • WP eMember Plugin
  • Projects
  • Home

Bulk Member Data Importer Addon

The bulk member data importer addon lets you import all your member’s info from a CSV file.

Installing the AddOn

  • Upload the “emember-bulk-member-import.zip” file via the WordPress’s plugin uploader interface (Plugins -> Add New -> Upload)
  • Activate the plugin through the “Plugins” menu in WordPress.

Using The Bulk Importer Addon

Step 1) Prepare the CSV File with Member Information

The first step is to add members to a CSV file under the proper headings. You can download a skeleton of the CSV file here to get an idea of the layout needed.

Please use MS Excel in a windows machine to modify/create the CSV file for best result. It will create the CSV file with the correct format.

If you are exporting from another program, providing it is flexible enough to “order” the headings, be sure to export as CSV. You can then open the file using a spreadsheet software like Excel (or OpenOffice), then paste the headings on top.

When opening the CSV file using spreadsheet software, you will be prompted about which delimiter to use. “Comma” should be selected by default but if not make sure that it is selected, and that it is the only option selected in order for the file to show up as it should. The skeleton file available from the above link will have sample data (that can be safely removed) to give you an idea of the format for the fields.

Step 2) Use the interface to import the data

1) Open the eMember Bulk Importer page by clicking WP eMember -> Member Bulk Import.

2) Click the Upload a .csv file button.

3) Locate the .csv file on your computer and double click it.

4) An Import Summary will be displayed. We’re looking for the Total and Succeeded columns to have the same value at this point.

5) Click WP eMember -> Members to see the newly added/imported members.

Imported Member’s Password

The plugin will generate a random password for the imported users and send them the reset password email. You can customize this email from the “Email Settings” menu of the WP eMember plugin.

AddOn Price

The addon is FREE for all customers who purchased WP eMember plugin from us.

Download the Addon

You can download this addon from the addon download area of our customer only support forum

  • Addon download area

Please note that some of these free addons are developed by our users in the community. So these addons do not have any advanced customization option. The description above explains exactly what this addon does.

Filed Under: eMember Addon Tagged With: emember addon, import, member, WP eMember

WP eMember Email Broadcast Add-On Plugin

The eMember email broadcast addon gives you the ability to send an email broadcast to your members from within the WordPress dashboard.

This isn’t the same as sending an email to an existing list through a 3rd party like AWeber, MailChimp, or GetResponse. However the ‘Autoresponder Integration’ feature built into the main eMember plugin does allow for members to be added to your lists automatically. This is more meant for those that do not use a 3rd party email marketing provider, or just want to send a quick email to all (or a selection of) members.

Installing The Add-On Is Like Installing Any Other Plugin

  • Upload the “emember-email-broadcast.zip” file via the WordPress’s plugin uploader interface (Plugins -> Add New -> Upload)
  • Activate the plugin through the “Plugins” menu in WordPress.
  • Go to the Email Broadcast interface from the eMember dashboard menu.

Be sure that the WP eMember plugin is already installed and activated or else the add on will have no use.

How To Send An Email Broadcast

The email broadcast feature is a flexible way to send emails to all or some of the members of your membership site. You have the ability to send to: members of one or more specific membership levels, one or more specific members, only active members, only inactive members, only pending members, only expired members, or of course to all members as mentioned.

Follow the quick steps below to send a message:

1) Enter in a Subject line for the email.

2) Enter in a Message to send and include any “tokens” (or shortcodes) to fill in certain information dynamically. You simply just have to click on a specifc token to have it placed at the end of the message. Options include: User Name, First Name, Last Name, Member Since Date, Membership Level, Account State (active or pending etc), Gender, Company, Email, Phone, and Subsrciption Starts Date.

3) Optionally enter in a Signature.

4) Specify a Send Date.

5) Select from the different options for who you want to send the email to.

6) Click Send!

AddOn Price

The eMember Email Broadcast addon is FREE for all customers who purchased WP eMember plugin from us.

Download the Addon

You can download this addon from the addon download area of our customer only support forum

  • Addon download area

Using Emoji in Your Email Subject or Body

If you want to use Emoji in your Email Subject or Body, then you will need to make sure the Database table columns for the email broadcaster addon uses a collation value of “utf8mb4_unicode_ci”. You can go to PHPMyAdmin of your site to access your WordPress database and then view the “wp_eMember_email_broadcast” database table to make modifications.

General Note

Please note that some of these free addons are developed by our users in the community. So these addons do not have any advanced customization option. The description above explains exactly what this addon does.
Filed Under: eMember Addon Tagged With: email, email list, emember extension, WP eMember

How to Create Teaser Content for Your Membership Site

What is Teaser Content

A teaser is a short part of content to draw user in. It is used to “tease” a visitor into reading/viewing the rest of the content and in the process become a member of the site.

How to Create Teaser Content Using eMember

There are two ways you can create teaser content using eMember:

  1. Using the More Tag Protection Feature
  2. Using the Section/partial Content Protection Feature

Method 1) Using the More Tag Protection Feature

First, enable the more tag protection by checking the “Enable More Tag Protection” option from eMember’s settings screen.

Next, insert WordPress’s “More Tag” marker in your posts to tell eMember what content is teaser and what content is for members only.

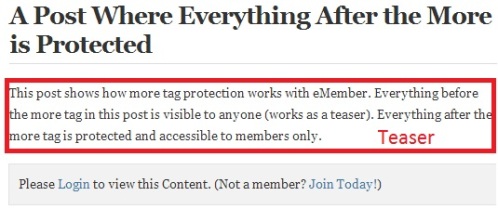
The content before that more tag marker in a post will be visible to everyone and serve as a teaser. The content after the more tag marker will be protected/hidden and only be available to logged members.

Example:

Teaser Content Example

Method 2) Using Section/Partial Protection Feature

You can also use eMember’s section/partial protection feature to hide certain section/area of the post or page. The section of the content that you keep open for everyone serves as a teaser.

Please check our documentation on section protection feature to learn how to use this feature.

Filed Under: Design & Usage Tagged With: create teaser content, partial content protection, section protection, teaser content, WP eMember

Automatically Redirect Your Members to a Page After They Login

WP eMember has an “After Login Redirection” feature that you can use to automatically send the members to a specific page (example, members only area) when they log into the site.

How to Enable the After Login Redirection Feature

  • Go to the WP eMember Settings menu
  • Check the “Enable After login Redirection” checkbox
  • Save the settings by clicking the update button at the bottom of this page

How to Configure Which Page to Redirect to

There are 3 options to choose from:

  1. You can redirect all of your members to a specific page upon login. Simply specify the URL of the page in the "eMember settings -> Pages/Forms Settings -> After Login Page" field.
  2. You can redirect members to a specific page based on their membership levels. Specify the URL of the redirect page in the "Membership Level -> Redirect After Login" field to configure a per membership level specific redirection page.
  3. You can also redirect on a per user basis (redirect a specific member to a specific page). Specify the URL of the redirect page in the "Members -> Edit a member's record -> After Login Page URL" field to configure a per user specific redirection page.

Can I Use a Mixture of These Available Redirections?

Yes, you can mix them up. This is how eMember will determine the after login redirection of a user when he/she logs into the site:

  • First, it will check if there is a user specific redirection available for the member. If it finds one then it will redirect the member to that page.
  • If a user specific redirection is not present, the plugin will check if a membership level specific redirection is configured. If it finds one then it will redirect the member to that membership level redirection page.
  • If the plugin can’t find any of the above, it will redirect the user to the global/general redirection page specified under the “Pages/Forms Settings” area.

Do Not Trigger After Login Redirection when Logging in via Inline Login Widget

This option can be used to keep the user on the current page when they are logging in via the inline login widget. The inline login widget is shown when a member clicks on the login link inside a protected post/page.

You can enable the following option in eMember plugin settings:

Prevent After Login Redirection When Logging in via Inline Login Option

When this option is enabled, the after login redirection won’t get triggered when the login action happens via the inline login widget. If the member goes to the standard login page and logs in then the redirection will work as configured in your site.

Create a Custom Link to the Login Page to Redirect to a URL

The after login redirection will honor the redirect_to query parameter in the URL. If you specify a URL value via the redirect_to parameter then it will send the user to that URL after the loging (ignoring any after login redirection that you may have configured in the settings).

Below is an example of how you can use the redirect_to parameter to create a link to the login page.

https://www.mysite.com/member-login/?redirect_to=https://www.mysite.com/special-redirect-page

If a user clicks on this link and logs into the site from the login page, he will get redirect to that specified URL.

Create a Custom Link to Override the Login Redirection

You can specify the no-redirect parameter in the login page’s URL to prevent the after login redirection.

Below is an example of how you can use the no-redirect parameter to create a link to the login page.

https://www.mysite.com/member-login/?no-redirect=1

When a member clicks on the following link and logs into the site, there will be no after login redirection for him (even if you have enabled the redirection feature).

Filed Under: Design & Usage Tagged With: after login redirection, member login redirection, Usage Guide, WP eMember

Overview of the Available Content Protection Methods

WP eMember has a few types of content protection methods available to help you protect your content. Most users use the “Standard Protection” and “Section Protection” options but depending on your situation the others might come in handy too.

This page provides an overview/summary of the different ways you can protect your content. There is documentation for each of these protection options which explains how a particular method works and how you can use it.

1) Standard Protection:

Protects the main body of the content (example, post body, page body). Visitors can browse the site as usual but they won’t be able to see the content of the protected posts, pages, comments etc. You control this type of protection via the “Manage Content Protection” tab or the “eMember Protection” section below the WordPress post editor at the time of editing your post/page. Full details on how to use this method of protection can be found here.

2) Section Protection:

You can also protect a section of a post or page content. Visitors can browse the site as usual but they won’t be able to see the section that is protected unless they are logged in as a member. Section protection is applied via a shortcode (you wrap the content that you want to protect with this shortcode). Full details on how to use it can be found here.

3) Site Wide Protection:

WP eMember has a site wide protection feature. When you use this feature, nothing on your WordPress site is accessible unless the visitor logs in as a member. You can selectively exclude some of your pages (example, a landing page) so it can be accessible without having to log in.

There is also an option to do the opposite of the above. Instead of locking down the full site you can selectively lock-down some pages or a group of pages on your site. The visitor won’t be able to see any part of the locked down pages unless they log in as a member. Full details of this option can found here.

4) Custom Content Protection:

This option is mainly useful for developers. WP eMember has a few functions that can help you write code to dynamically protect some content of your site. The snippets of code on this page will give you an idea of how it can be used.

Video Tutorial

Filed Under: Content Protection Tagged With: membership protection, WP eMember

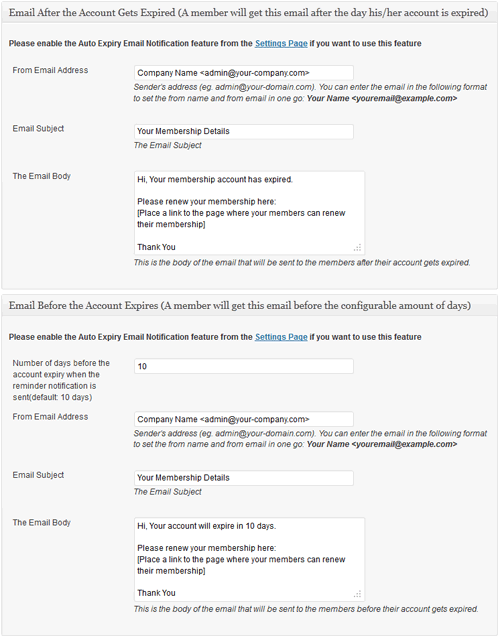
Setting Up “Before” and “After” Member Account Expiry Notification Email

WP eMember can notify your members whose account is about to be expired or has just expired. You can use this feature to automatically prompt your members to renew their membership or take some other actions.

Do the following to use this feature:

  1. Enable the auto expiry email feature by checking the “Enable Auto Expiry Email Notification” checkbox in the eMember settings menu
  2. Customize the email from address, subject and the body.
  3. Save everything

Member account expiry notification email

Filed Under: Design & Usage Tagged With: auto expiry email, WP eMember

Free Members Must Confirm Their Email Address

Usually you just send the visitors who are after a free membership to the “Registration” page and they can signup for a free membership (signing up for a free membership has no restriction). If you want to make it so they need to confirm their email address before they can create a free account (similar to what happens for the paid membership) then you can achieve that using one of the following two methods (use the one that suits your setup).

Note: you only need to use one of the following two methods (there is no need to follow both of them)

Method 1

Go to the settings menu of the WP eMember plugin and check the “Free Members Must Confirm Email Address” field. When this option is checked, the standard registration form gets replaced with with a small registration initiation form for email verification (the user will see the full registration form after the verification). When a user fills in this email verification form (name and email address) a unique registration link is sent to the specified email address. Users will only be able to register for a free member account after they click on the unique registration link sent to their email address.

Method 2

In this method you simply need to add in one extra step before the registration.

Create a NEW WordPress page with the desired name (example: Free Membership) then place the following shortcode on that page:

[free_rego_with_email_confirmation]

Now, you can place a link on your “Join Us” page to this newly created page to start sending potential visitors. When they fill in the form created by the above shortcode they will receive an email which will let them complete the free membership registration after they click on the link sent to them via email.

Using with a Particular Membership Level

You can also use this shortcode with a particular membership level. This is useful if you want to offer multiple free membership levels.

So for example, if you wanted to use it for membership level ID 2 then you could use the following shortcode:

[free_rego_with_email_confirmation level=2]

Redirecting to a Page

You can also setup a redirection with this shortcode so that the users get redirected to a page after they submit the form. Use the “redirect_to” parameter in the shortcode to specify a page URL where you want to redirect the users after they submit the free registration confirmation form.

Example shortcode usage below:

[free_rego_with_email_confirmation redirect_to="http://example.com/page-after-submitting-form"]

Note

We get asked the following question a lot on this “Free member must confirm email” topic:

Q. Can we still use the full registration form for free membership or why can’t I see the full registration form?

A. The key thing to understand here is that you are not replacing the full registration form. The member will still need to fill in the full registration form and choose the username and password. All you are doing is adding a step before they get to do that to make sure the email address gets confirmed. The summary…  when a vistior fills out the small form and clicks on the link sent to him/her via email the visitor will be able to fill in the full registration form and become a free member.

Essentially this is the same process as the paid membership. In this case, instead of making a payment the visitor is filling out a small form to initiate the membership account creation process.

Filed Under: Design & Usage Tagged With: confirm email address, WP eMember

How to Use Google First Click Free Feature with Your Membership Site

Implementing Google’s First Click Free (FCF) for your content allows you to include your restricted content in Google’s main search index. WP eMember has an option that allows you to enable the Google first click free feature on your membership site.

What is Google First Click Free Feature?

  • Read the details of First Click Free feature from Google’s site
  • More details from the Google Webmaster Central Blog

What You Need to be Aware of?

  • When you use this feature a visitor (non-member) can see your protected content if they follow a link from Google’s Search result. So yes, you are somewhat compromising the security of your protected content.
  • All users who click a Google search result to arrive at your site should be allowed to see the full text of the content they’re trying to access.
  • The page displayed to all users who visit from Google must be identical to the content that is shown to Googlebot.
  • We implemented this feature following exactly what Google recommended and we intend to keep it this way (it is good idea to follow Google’s policies if you don’t want to get your site banned).
If you are uncomfortable with any of the above then DO NOT use this feature.

How Do You Enable it in eMember?

  1. Go to the settings menu of eMember and check the “Enable Google First Click Free Feature” field to enable this feature.
  2. Wait for Google to index your protected content.
Now, when a user follows a Google search result and lands on your protected article, WP eMember will display the full content of the protected article to this user. If the user clicks on any other link on your site then the normal protection rules are applied as usual.

Filed Under: Design & Usage Tagged With: Google First Click Free, WordPress membership, WP eMember

WP eMember Frequently Asked Questions (FAQ)

  • Does this plugin work with the latest version of WordPress?

Yes, all of our plugins work with the latest version of WordPress. The plugin is always kept upto date to work with the latest version of WordPress. So in the future you will always have a membership plugin that works with the latest WordPress updates.

  • Are there any ongoing fees for WP eMember plugin?

No, the WP eMember plugin is a one time purchase software.

  • Why buy a premium WordPress plugin?

See the why buy a premium WordPress plugin page.

  • Does this product integrate with WordPress’s user system?

Yes, the WP eMember can create a WordPress user log-in with the same details as the membership when the customer registers.

  • How does the member get the registration link after a purchase is made?

The member is email out a link to complete the registration process after they have completed their payment.

  • Can a customer sign up for a recurring membership if they do not have a PayPal account?

The standard PayPal subscription payment requires a PayPal account for all recurring payments. However, you can enable the enhanced recurring billing feature in your PayPal merchant account which will let your customers pay for subscription using a credit card. Your customers can sign up for a PayPal account (if they don’t have one already) when they go to make the purchase.

  • What type of license does the WP eMember have, can I use this plugin on more than one site?

Read the WP eMemeber Licensing Details.

  • Can I translate the WP eMember plugins in to my own language?

Yes, You can translate the front end of the plugin (the information that the customer sees). You can read more about this here.

  • If I buy the WP eStore, WP eMember and WP Affiliate plugins and activate and setup all 3, will I be able to run a membership site that charged a monthly RECURRING price with the affiliate program, giving the affiliate commission each month the member is signed up?

Yes

  • Is there a limit to the membership levels or members I can have?

No, there is not a limit on membership levels or the number of members you can have.

  • What forum plugin can I use with the eMember?

WP eMember will work with any forum plugin that utilizes the WordPress’s user roles. eMember has a feature for keeping the members in sync with WordPress users. BBPress and SimplePress seems to be the popular choice at the moment and our customers have been using those with eMember.

  • What payment gateways can I use for my membership site?

The WP eMember can be integrated with PayPal and ClickBank in a standalone setup. You can also integrate eMember with WP eStore which allows you to use any of the Payment Gateways offered by the eStore plugin. Read more on this on our Documentation site.

  •  What AutoResponders can the WP eMember integrate with?

The WP eMember can integrate with AWeber, MailChimp, GetResponse autoresponders.

  • Can I protect only a section of a post and have some teaser content that everyone can see?

Yes you can protect just a section of a post or page. There are a few options on how you can do this, for more information on these options go here.

  • Can I drip content to my members?

Read this document for more information about the drip content feature

  • Can I use one user database to handle member login from multiple different WordPress installs?

No, this is not a supported feature of WordPress. There are some hacks out there but we do not support these hacks.

  • If I change membership plugins do my members have to recreate their recurring payments again?

Yes, PayPal does not allow you to modify a recurring payment once it is established.

  • Can I have it so members have to be approved by the admin after they sign up for a membership before they can view the content? 

Yes

  • Can I have both free and paid memberships at the same time?

Yes, you can have both free and paid memberships for your membership site.

  • Can I have a trial period with the WP eMember?

Yes, you simply create a subscription payment option with trial period.

  • If a membership level expires will it automatically transition to the free membership level?

You can allow your users to downgrade to a free membership level:
http://www.tipsandtricks-hq.com/forum/topic/wp-emember-downgrade-member-level-from-premium-to-free

  • Does eMembers signup process replace the default registration process used by Buddypress/Wordpress?

Yes, it is better to have one registration and log-in process for the whole site (you can still use them if you like but I think it may be confusing for your users to have to remember different login pages).

Filed Under: Additional Resources Tagged With: FAQ, WP eMember

How to Use Public Profile Listing (Member Directory Listing)

If you want to list all your members in a public directory style on a webpage so others can browse the list then use the “Public Profile Listing” feature.

New Way of Displaying Member Listing

We have created a free addon that can display a public profile listing of your members. This new extension is the preferred method of showing a user list on your site. Use this profile display extended addon to show your member list.

Old Way of Displaying Member/User Listing

The following documentation exists for backwards compatibility. It should not be used anymore to setup profile listing.

Step1: Enable this feature by checking the “Enable Public profile Listing” field in the settings menu of WP eMember.

Step2: Create a WordPress page and use the following shortcode to display the member list:

[wp_eMember_user_list]

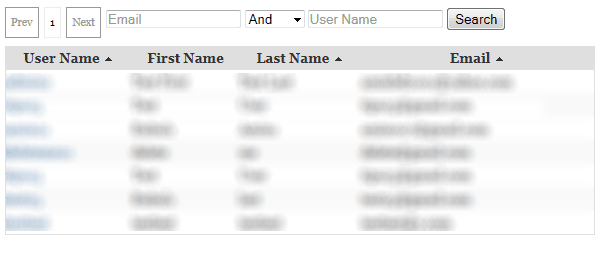
This will show the member directory like the following:

wp-emember-public-profile-listing-sample

Public Profile Listing Sample

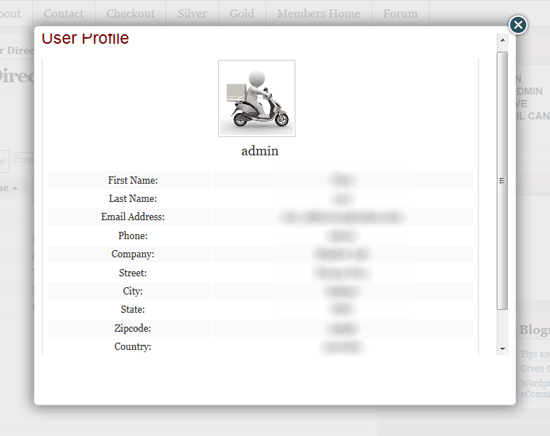
Clicking on an username will bring up the details of that user:

wp-emember-public-profile-listing-member-details-sample

Public Profile Details Sample

If you do not want to display the “Email Address” field then you can use the following shortcode to display the public profile listing which will keep the email address of the users hidden:

[wp_eMember_user_list no_email=1]

More Customization Option of Displaying Member Profile

If you need more customization options as to which fields gets shown then checkout the eMember profile extended addon.

Filed Under: Design & Usage Tagged With: Profile Listing, WP eMember

  • « Previous Page
  • 1
  • 2
  • 3
  • 4
  • 5
  • Next Page »

Get the WP eMember Plugin

Get WP eMember

Categories

  • Additional Resources
  • Content Protection
  • Design & Usage
  • eMember Addon
  • Installation
  • Integration
  • License
  • Testing
  • Uncategorized
  • Video Tutorial

Recent Comments

  • Chris Brown on API – Querying A Member Profile Using HTTP GET or POST
  • admin on API – Updating A Member Account Using HTTP GET or POST
  • Chris Brown on API – Updating A Member Account Using HTTP GET or POST
  • admin on API – Updating A Member Account Using HTTP GET or POST
  • Andrea on API – Updating A Member Account Using HTTP GET or POST

Featured WordPress Plugins

wordpress_estore_icon
wordpress membership plugin icon
WP Express Checkout Plugin
WordPress Lightbox Ultimate Plugin
WordPress Photo Seller Plugin
wordpress_affiliate_plugin_icon

Copyright © 2023 | WP Membership Plugin