WordPress Membership

Easy to use WordPress Membership plugin

  • Documentation
  • WP eMember Plugin
  • Projects
  • Home

eMember Stats/Analytics Addon

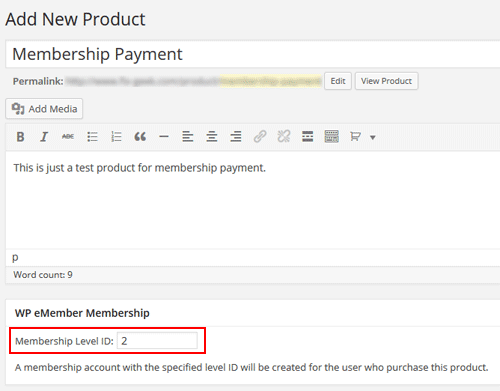
This addon shows you various eMember stats of your membership site.

  • See pageviews of your members
  • Count of pageviews
  • Login counts by day
  • New member registration by month
  • Members by country

Installing the Stats AddOn

  • Upload the “emember-stats.zip” file via the WordPress’s plugin uploader interface (Plugins -> Add New -> Upload)
  • Activate the plugin through the “Plugins” menu in WordPress.

Using The Addon

Click on the “Analytics” menu from the WP eMember plugin’s admin dashboard menu.

Database Tables

This addon will create additional database tables in your WordPress site’s database to store pageviews and other data. If you have a lot of members then the database table sizes can be large.

Download the Addon

Click here to download this adddon and try it on your site.

Filed Under: eMember Addon Tagged With: emember addon, member, WordPress membership

WooCommerce and WP eMember Integration

You can integration WP eMember with WooCommerce so you can accept membership payment via WooCommerce.

Accept Membership Payment Via WooCommerce

Step 1) Download the integration addon plugin from here.

Step 2) Install the addon just like any other WordPress plugin.

Step 3) When creating a new WooCommerce product (or editing one), you can specify a membership level for that product.

woocommerce-and-membership-payment

Now, when a customer purchase this product, a membership account (for the specified access level) will be created for the user.

Note: Your WooCommerce checkout for all products in the shop stay as is. The eMember plugin will ONLY  monitor the product checkout for products where you have specified a membership level ID. When you specify a membership level ID value in a WooCommerce product, you are telling our plugin that this product is for a membership payment.

Membership Registration Setup with WooCommerce

There are a couple of different ways you can setup the membership registration scenario.

1) WooCommerce and eMember Registration Scenario 1

In this setup, you just use WooCommerce to do the checkout. The user/member account creation process is completely handled by eMember.

You will turn off all the WooCommerce account creation options from the “Accounts” settings of WooCommerce.


woocommerce-account-settings-interface-for-scenario-1

Here is a typical flow of how this process works:

  1. A visitor buys a membership product from your WooCommerce store.
  2. Once the payment is confirmed, WooCommerce will notify the eMember plugin.
  3. At this point the plugin knows what membership level this user paid for, the plugin will create the appropriate membership account for this visitor.
  4. The member will receive an email that contains a “unique” link to complete the registration.
  5. When the member clicks on that link in the email it will let him choose a “username” and “password” and complete the registration.
  6. At this point the member can log into the site via eMember and enjoy the premium members only content.

Your membership products are virtual products. So make sure the “Virtual” and “Download” options are enabled in your WooCommerce product in question. This way the order will immediately go to “complete” status after successful payment.

2) WooCommerce and eMember Registration Scenario 2

This setup is good for users who want to use the account creation option of WooCommerce.

Go to the Admin Functions menu of eMember and enable the auto create eMember account feature. Create a free membership level (just so you can use it as a default level).

Also, you can optionally enable this feature to keep the user records in sync.

Here is a typical flow of how this process works

  1. A visitor buys a membership product from your WooCommerce store.
  2. Once the payment is confirmed, WooCommerce will create a WP User account for this user (just like it does for any product checkout).
  3. Then WooCommerce will notify the eMember plugin.
  4. eMember will create a corresponding eMember user record then upgrade that account to the appropriate membership level (the one this user paid for).
  5. At this point the member can log into the site via eMember and enjoy the members only content.

WooCommerce Payment/Order Status

Our plugin will only process orders/payments that are set to “processing” or “completed” status in WooCommerce. This is to make sure the money has been received before the member account gets created (or updated).

If your WooCommerce setup is correct, then the order status will be set correctly after an online payment is received. So it should work in an automated fashion.

However, if you are accepting manual payment then you need to review your order and set the order status correctly after you receive money from the customer. You can also use an WooCommerce extension to set the order status to complete automatically (after you receive an order).

Keeping the WooCommerce and eMember Logins in Sync

This is optional but you should enable this setting so when members log into the site via eMember’s login, they automatically get logged into their WooCommerce account (and vice versa).

Filed Under: Additional Resources, eMember Addon Tagged With: 3rd party integration, commerce, emember addon, emember extension, member, membership payment

WP eMember Sendy Integration Addon

The eMember Sendy Newsletters integration addon allows you to add your members to your sendy.co list when they signup for a membership account.

Installing the Sendy Integration Addon

You can install this addon the same way you install any WordPress plugin:

  • Go to the “Add New” plugins screen in your WordPress admin area
  • Click the “upload” tab
  • Browse for the plugin file (emember-sendy-integration-addon.zip)
  • Click “Install Now” and then activate the plugin

Using the Sendy Integration Addon

Step 1) Go to the sendy integration addon menu and enter your sendy installation URL and Sendy API Key then save the settings:

Step 2) Edit the membership level in question and enter your Sendy list ID in the “Autoresponder List/Campaign Name” field:

sendy-integration-level-settings

When a member signs up to this membership level, the plugin will subscribe this user to the specified sendy list.

AddOn Price

The addon is FREE for all customers who purchased WP eMember plugin from us.

Download the Addon

You can download this addon from the addon download area of our customer only support forum

  • Addon download area

Please note that some of these free addons are developed by our users in the community. So these addons do not have any advanced customization option. The description above explains exactly what this addon does.

Filed Under: eMember Addon Tagged With: Autoresponder, emember addon, emember extension, newsletter

Auto Downgrade Membership Account Addon

The auto downgrade membership account addon lets you automatically downgrade any of your expired or inactive premium member’s account to a free level. This lets your premium members who cancelled the payment to still be able to log into your site and browse content for a Dummy/Free membership level.

[Read more…]

Filed Under: eMember Addon Tagged With: emember addon, Membership Level, membership protection, WP eMember

WP eMember MailPoet NewsletterIntegration Addon

The eMember MailPoet Newsletters integration addon allows you to add your members to the MailPoet list when they signup for a membership.

Installing the MailPoet (Formerly Wysija) Newsletter Integration Addon

First, install the main MailPoet (Wysija) Newsletter plugin (if you don’t have it installed already).

Next, Install the eMember mailpoet integration addon. You can install this addon the same way you install any WordPress plugin:

  • Go to the “Add New” plugins screen in your WordPress admin area
  • Click the “upload” tab
  • Browse for the plugin file (emember-wysija-newsletter-addon.zip)
  • Click “Install Now” and then activate the plugin

Using the eMember MailPoet Newsletters Addon

After you install this addon using the above instruction do the following:

Step 1) Create a new list in the MailPoet Newsletters plugin (if you haven’t done so already). Now edit the list you just created and find the unique ID assigned to it.

To edit a list you need to go to MailPoet -> Lists interface and select the “Edit” option under the list.

mailpoet-lists-menu-screenshot-1

Once you click the “Edit” option you will be able to find the List ID from your browser’s address bar.

mailpoet-list-id-from-the-list-edit-interface

Step 2) Edit the eMember Membership Level  and specify the MailPoet list ID in the autoresponder List/Campaign Name field.

members-wysija-newsletter-integration-sc

Save the membership level and you are done!

Now, every time when a new member joins this membership level, the member will be automatically added to the specified MailPoet list.

AddOn Price

The addon is FREE for all customers who purchased WP eMember plugin from us.

Download the Addon

You can download this addon from the addon download area of our customer only support forum

  • Addon download area

Please note that some of these free addons are developed by our users in the community. So these addons do not have any advanced customization option. The description above explains exactly what this addon does.

Filed Under: Additional Resources, eMember Addon Tagged With: emember addon, newsletter

Bulk Member Data Importer Addon

The bulk member data importer addon lets you import all your member’s info from a CSV file.

Installing the AddOn

  • Upload the “emember-bulk-member-import.zip” file via the WordPress’s plugin uploader interface (Plugins -> Add New -> Upload)
  • Activate the plugin through the “Plugins” menu in WordPress.

Using The Bulk Importer Addon

Step 1) Prepare the CSV File with Member Information

The first step is to add members to a CSV file under the proper headings. You can download a skeleton of the CSV file here to get an idea of the layout needed.

Please use MS Excel in a windows machine to modify/create the CSV file for best result. It will create the CSV file with the correct format.

If you are exporting from another program, providing it is flexible enough to “order” the headings, be sure to export as CSV. You can then open the file using a spreadsheet software like Excel (or OpenOffice), then paste the headings on top.

When opening the CSV file using spreadsheet software, you will be prompted about which delimiter to use. “Comma” should be selected by default but if not make sure that it is selected, and that it is the only option selected in order for the file to show up as it should. The skeleton file available from the above link will have sample data (that can be safely removed) to give you an idea of the format for the fields.

Step 2) Use the interface to import the data

1) Open the eMember Bulk Importer page by clicking WP eMember -> Member Bulk Import.

2) Click the Upload a .csv file button.

3) Locate the .csv file on your computer and double click it.

4) An Import Summary will be displayed. We’re looking for the Total and Succeeded columns to have the same value at this point.

5) Click WP eMember -> Members to see the newly added/imported members.

Imported Member’s Password

The plugin will generate a random password for the imported users and send them the reset password email. You can customize this email from the “Email Settings” menu of the WP eMember plugin.

AddOn Price

The addon is FREE for all customers who purchased WP eMember plugin from us.

Download the Addon

You can download this addon from the addon download area of our customer only support forum

  • Addon download area

Please note that some of these free addons are developed by our users in the community. So these addons do not have any advanced customization option. The description above explains exactly what this addon does.

Filed Under: eMember Addon Tagged With: emember addon, import, member, WP eMember

eMember addon – Disable Button After Form Submission

This addon plugin will disable the registration and login form button immediately after the user clicks the button. If you have a slightly slow loading site then this should prevent users from clicking again and again when the form data is being submitted.

Installing the AddOn

  • Upload the “emember-disable-button-after-submission.zip” file via the WordPress’s plugin uploader interface (Plugins -> Add New -> Upload)
  • Activate the plugin through the “Plugins” menu in WordPress.

Using The Addon

You don’t have to do anything other than keeping it active.

AddOn Price

The eMember Email Broadcast addon is FREE for all customers who purchased WP eMember plugin from us.

Download the Addon

You can download this addon from the addon download area of our customer only support forum

  • Addon download area

Please note that some of these free addons are developed by our users in the community. So these addons do not have any advanced customization option. The description above explains exactly what this addon does.

Filed Under: eMember Addon Tagged With: disable button, emember addon, emember extension, registration form

WordPress Newsletter Plugin (by Tribulant Software) Integration Addon

The WordPress newsletter plugin is a newsletter software for WordPress which allows you to gather unlimited email subscribers, organized into multiple mailing lists.

Tribulant has created an eMember addon that allows your members to be added to the WordPress newsletter plugin. View the full details of this newsletter plugin addon here.

It can sync memberships with subscribers.

Filed Under: eMember Addon Tagged With: 3rd party integration, emember extension, Integration, newsletter

WP eMember Email Broadcast Add-On Plugin

The eMember email broadcast addon gives you the ability to send an email broadcast to your members from within the WordPress dashboard.

This isn’t the same as sending an email to an existing list through a 3rd party like AWeber, MailChimp, or GetResponse. However the ‘Autoresponder Integration’ feature built into the main eMember plugin does allow for members to be added to your lists automatically. This is more meant for those that do not use a 3rd party email marketing provider, or just want to send a quick email to all (or a selection of) members.

Installing The Add-On Is Like Installing Any Other Plugin

  • Upload the “emember-email-broadcast.zip” file via the WordPress’s plugin uploader interface (Plugins -> Add New -> Upload)
  • Activate the plugin through the “Plugins” menu in WordPress.
  • Go to the Email Broadcast interface from the eMember dashboard menu.

Be sure that the WP eMember plugin is already installed and activated or else the add on will have no use.

How To Send An Email Broadcast

The email broadcast feature is a flexible way to send emails to all or some of the members of your membership site. You have the ability to send to: members of one or more specific membership levels, one or more specific members, only active members, only inactive members, only pending members, only expired members, or of course to all members as mentioned.

Follow the quick steps below to send a message:

1) Enter in a Subject line for the email.

2) Enter in a Message to send and include any “tokens” (or shortcodes) to fill in certain information dynamically. You simply just have to click on a specifc token to have it placed at the end of the message. Options include: User Name, First Name, Last Name, Member Since Date, Membership Level, Account State (active or pending etc), Gender, Company, Email, Phone, and Subsrciption Starts Date.

3) Optionally enter in a Signature.

4) Specify a Send Date.

5) Select from the different options for who you want to send the email to.

6) Click Send!

AddOn Price

The eMember Email Broadcast addon is FREE for all customers who purchased WP eMember plugin from us.

Download the Addon

You can download this addon from the addon download area of our customer only support forum

  • Addon download area

Using Emoji in Your Email Subject or Body

If you want to use Emoji in your Email Subject or Body, then you will need to make sure the Database table columns for the email broadcaster addon uses a collation value of “utf8mb4_unicode_ci”. You can go to PHPMyAdmin of your site to access your WordPress database and then view the “wp_eMember_email_broadcast” database table to make modifications.

General Note

Please note that some of these free addons are developed by our users in the community. So these addons do not have any advanced customization option. The description above explains exactly what this addon does.

Filed Under: eMember Addon Tagged With: email, email list, emember extension, WP eMember

WP eMember Form Builder Addon (Extension)

The eMember Form Builder Addon allows you to create registration and edit profile forms with custom fields.

WP eMember has a feature that allows you to control which fields appear on your membership registration form. It also lets you add your own custom fields to the registration form. The form fields customization documentation has details of this core plugin feature.

However, we have found that a few businesses out there need more flexibility in terms of customizing the form fields of the membership registration form. This addon was created to solve that issue. It allows you to create registration form(s) with whatever custom fields you require using a drag and drop system.

emember-form-builder-addon-screenshot

The following screenshot shows the various types of custom fields that you can add to your membership registration and edit profile forms to collect details from your members.

emember-form-builder-addon-custom-fields
emember-form-builder-addon-standard-fields

You can customize various details of each custom fields that you add to the form:

emember-form-builder-addon-screenshot-3

You can also create fields that are “ReadOnly” so your members can only see the content of the field but can’t edit it.

There is an option to create “Hidden” fields too. Hidden fields are not visible to the members (only admins can see the content of the hidden fields).

Installing the Form Builder Addon

  1. Click on the “Add New” menu under the plugins interface.
  2. Go to the “Uploader” tab and upload the emember-form-builder.zip file
  3. Hit the “Install Now” button and then activate the addon

Form Builder Addon Usage

Go to the form builder menu from the main eMember admin dashboard menu:

emember-form-builder-addon-menu

Click on the “New Form” link to create a new custom form:

creating-a-new-custom-form

You can create a custom form for each of your levels. However, you should create a “Generic” form first that way if you don’t have a custom form for a specific level, it will use the generic one for that level.

After you hit the “Create Form” button, you will be in the form customization interface where you will be able to visually add or remove fields for the registration and edit profile forms.

You have the option to apply the following  rules to your custom fields:

  • Show the field in the registration page only.
  • Show the field in the edit profile page only.
  • Make the custom field a required field (so a user has to enter a value in that field).
  • Make the field read-only (a user can only view the value of that field, edit is not allowed).
  • Show the field in the admin interface only (so only admin user can enter value there).

How do I show the Custom Form?

The custom forms you create in the form builder addon works with the existing registration page (and the registration page shortcode). The same goes for the edit profile page also.

You don’t need to do anything else other than to just create your custom forms and save the forms.

When your users visit the registration page, they will see the appropriate custom registration form (just like the standard eMember registration form). Don’t go to the registration page directly and expect to see a particular custom form.

You must read the following two documentation to learn how the registration form rendering behaves in the plugin:

  • How the plugin uses one registration page to handle all types of member registration
  • Typical member registration process overview

Placing a Custom Registration Form for a Particular Level

If you want to put a registration form for a particular membership level on a page for whatever reason, you can do that using the standard shortcode.

Read this documentation which explains how you can put a registration form for any level on any page.

Viewing the Custom Field Values

The site admin can go to the members menu of the eMember admin dashboard and edit a member record to view the custom fields of that member (just the same way you would view any other details of a member).

Also, if you have enabled the “Send Notification to Admin” option for the “Registration Complete” email, then the admin will receive the custom field values in that notification email.

Adding a Terms and Conditions Checkbox

You can use a “Checkbox” type field to add a terms and conditions checkbox to the registration form. This will force users to agree to your terms before they can complete the registration.

The following is an examaple showing how you can configure a simple terms and conditions checkbox.

The following screenshot shows how this terms and conditions checkbox looks on the front-end

Video Tutorial Showing the Basic Usage

Get This Addon/Extension

The price of this addon is $39.00

Filed Under: eMember Addon Tagged With: customize registration fields, emember extension, form builder

  • « Previous Page
  • 1
  • 2
  • 3
  • Next Page »

Get the WP eMember Plugin

Get WP eMember

Categories

  • Additional Resources
  • Content Protection
  • Design & Usage
  • eMember Addon
  • Installation
  • Integration
  • License
  • Testing
  • Uncategorized
  • Video Tutorial

Recent Comments

  • Chris Brown on API – Querying A Member Profile Using HTTP GET or POST
  • admin on API – Updating A Member Account Using HTTP GET or POST
  • Chris Brown on API – Updating A Member Account Using HTTP GET or POST
  • admin on API – Updating A Member Account Using HTTP GET or POST
  • Andrea on API – Updating A Member Account Using HTTP GET or POST

Featured WordPress Plugins

WP Express Checkout Plugin
wordpress_estore_icon
wordpress membership plugin icon
wordpress_affiliate_plugin_icon

Copyright © 2025 | WP Membership Plugin